Digital wallets that support the ENS resolver at the protocol level sometimes only display .eth names in their interface. The functionality of .locker and ENS works on the backend, but the .locker name may not auto-populate like other wallet addresses. This is a known limitation that does not affect the resolution of .locker names on the ENS resolver.
See the following user guides for next steps on using .locker with popular digital wallets:
The ENS resolver turns standard digital wallet hex records into human-readable names. Instead of using “x0sn73…t5G12” as your address, you can use something like “hello.locker.” .locker can be used with Ethereum dApps that use the ENS resolver.
When you register a .locker domain name and use a .locker digital identity, two different parties are involved. Knowing who to contact will help resolve your issues in a timely manner.
A domain registrar or reseller is the company you purchased a .locker domain name from. Your domain registrar is responsible for managing your domain name, which includes:
It’s important to manage your .locker domain registration with your registrar or reseller. You must keep your .locker domain name registered with your registrar or reseller to use it as a Web3 digital identity.
.locker is responsible for the Web3 digital identity component of your .locker domain name. Our team has developed and manages the smart contract technology that makes it possible to mint your .locker domain name on the Bitcoin blockchain as a digital identity and connect .locker with Ethereum addresses and wallets. .locker’s support team can help:
If you have any issues with expired tokens, digital wallet prompts, or receiving emails from .locker, check out the Help Center or contact our support team.
We designed .locker to be user-friendly, especially for those who are new to Web3. You don’t need any special technology to use .locker, but there are some requirements to having the best experience.
At this time, the .locker app, including the digital identity claiming flow, is not supported on mobile. We are working to launch mobile compatibility. In the meantime, we recommend the following desktop specifications.
If you’re having issues claiming your digital identity, check out our troubleshooting guides:
A Primary Name is the name you choose to use as your digital wallet address. Primary Names can be found in reverse lookups and is the main name you can transact with. You can have multiple names associated with a single wallet, but only one of those names can be used as an address.
Choose your Primary Name in your .locker dashboard. Click the star icon and follow the prompts.
Please visit our user guides for step-by-step instructions on how to use different features in the .locker app.
Please contact us at support@my.locker for all Web3 digital identity support-related issues.
If you’re having trouble accessing your .locker app, please contact support at support@my.locker.
Yes. Your.locker domain name can be sold or transferred to another person like a typical domain name. Once a registrant email is changed through a sale or transfer, a new corresponding and updated Web3 digital identity will be issued.
.locker domains and their corresponding Web3 digital identities can be renewed at the registrar of record where your domain is currently managed. Once you renew the domain name, your Web3 digital identity will also be renewed.
In order to activate the transfer option, at least one Bitcoin block (about 30 minutes) has to pass after the successful claiming of your.locker identity. This short wait will make sure that the claim gets fully processed and verified. After the predetermined time frame has expired, the transfer option will be unlocked on your.locker dashboard.
There is no additional cost associated with using .locker beyond what you pay the registrar for your domain name registration or renewal.
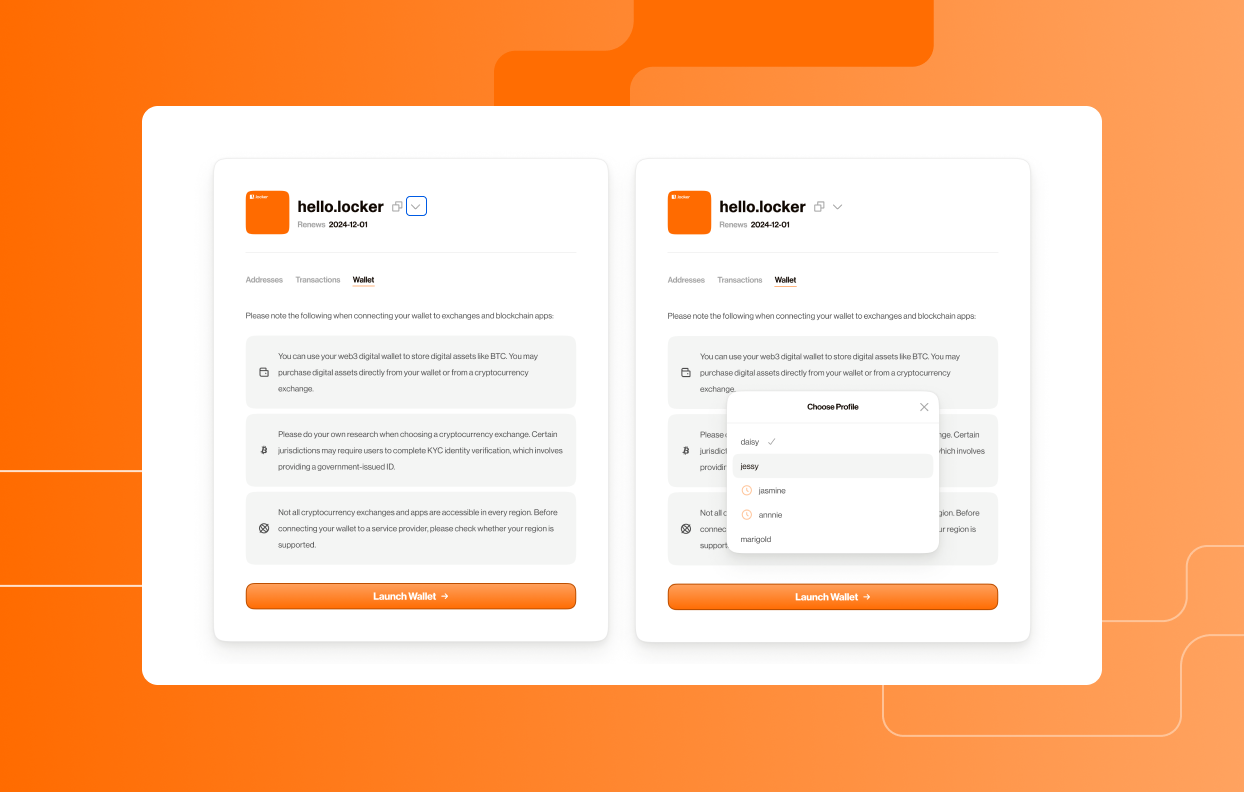
Yes, you can claim multiple .locker domain names. Each .locker domain name associated with your corresponding wallet can be viewed by clicking the dropdown menu next to a domain name on your .locker dashboard.
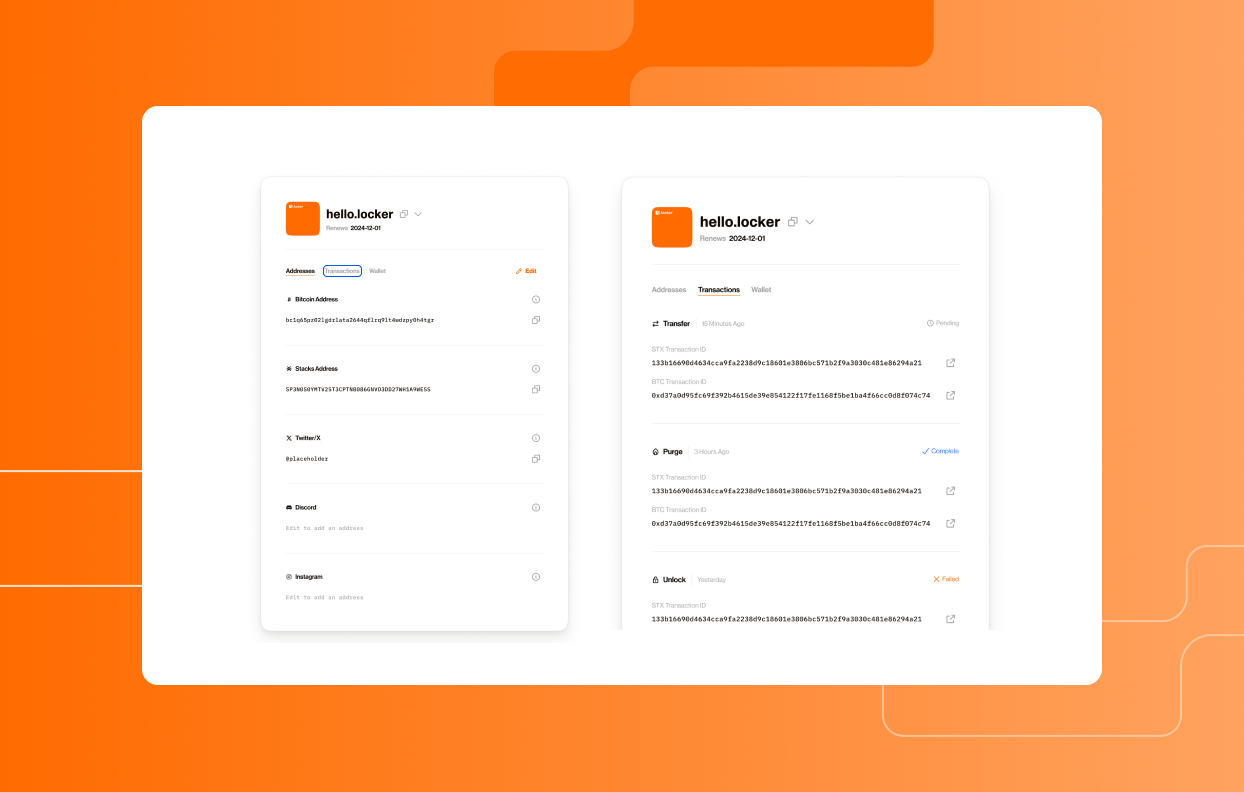
Yes, you can view transactions related to each domain name in the “Transactions” tab on the .locker dashboard. This includes any domain name-related transactions associated with your account.
.locker users who set up a Leather wallet extension will be able to access their .locker account on Chrome, Brave, Edge, and Opera. There is currently no mobile version of .locker application
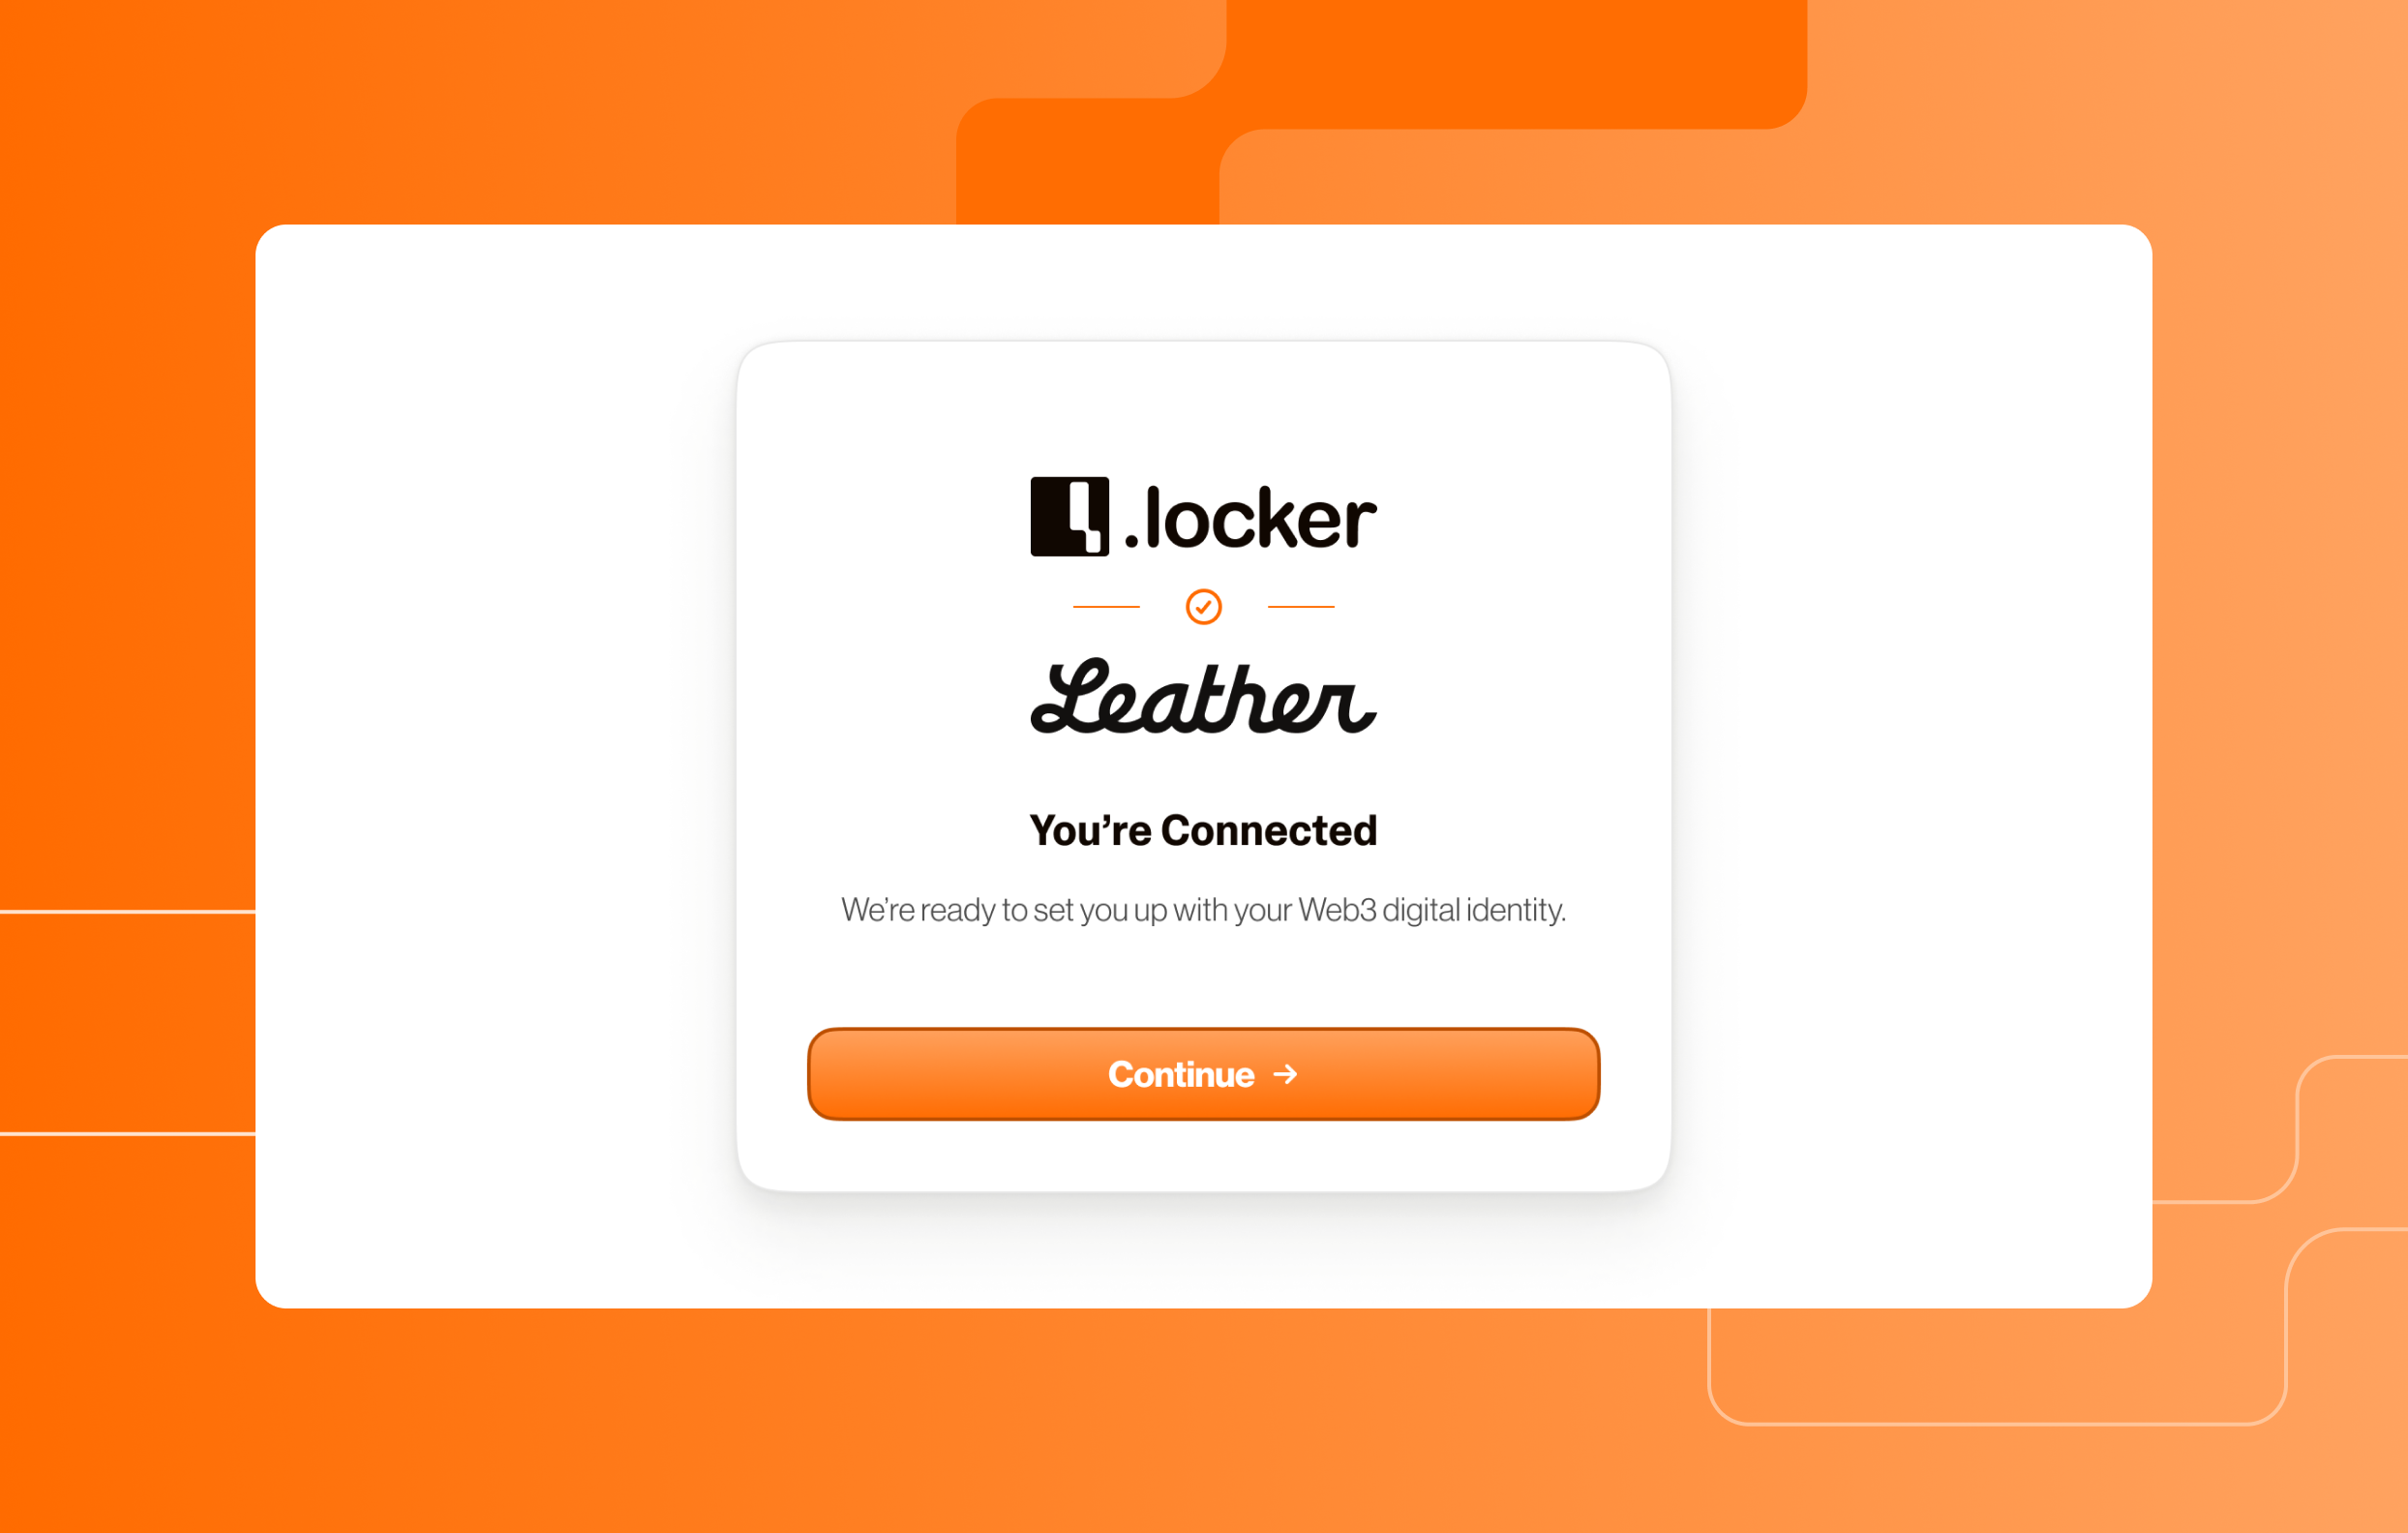
Yes. Users can connect an existing Leather or Xverse digital wallet during the .locker onboarding process. Once one of these wallets is configured with your .locker name, you’ll be able to link other Ethereum-compatible wallets, like MetaMask or Phantom. This allows you to use your .locker digital identity on both the Bitcoin and Ethereum blockchains.
Yes, because your Web3 digital identity is minted on the Bitcoin blockchain as an NFT, it must reside in a digital wallet. If you already have a Bitcoin-compatible wallet such as Leather or Xverse, you can use it for your .locker Web3 digital identity. If you do not have a Bitcoin compatible wallet, .locker will walk you through setting up and using your first Bitcoin-compatible wallet.
Once your Bitcoin digital wallet is configured, you will be able to link additional wallets to your .locker Web3 digital identity. In the .locker app, follow the prompts to add Ethereum and Solana addresses.
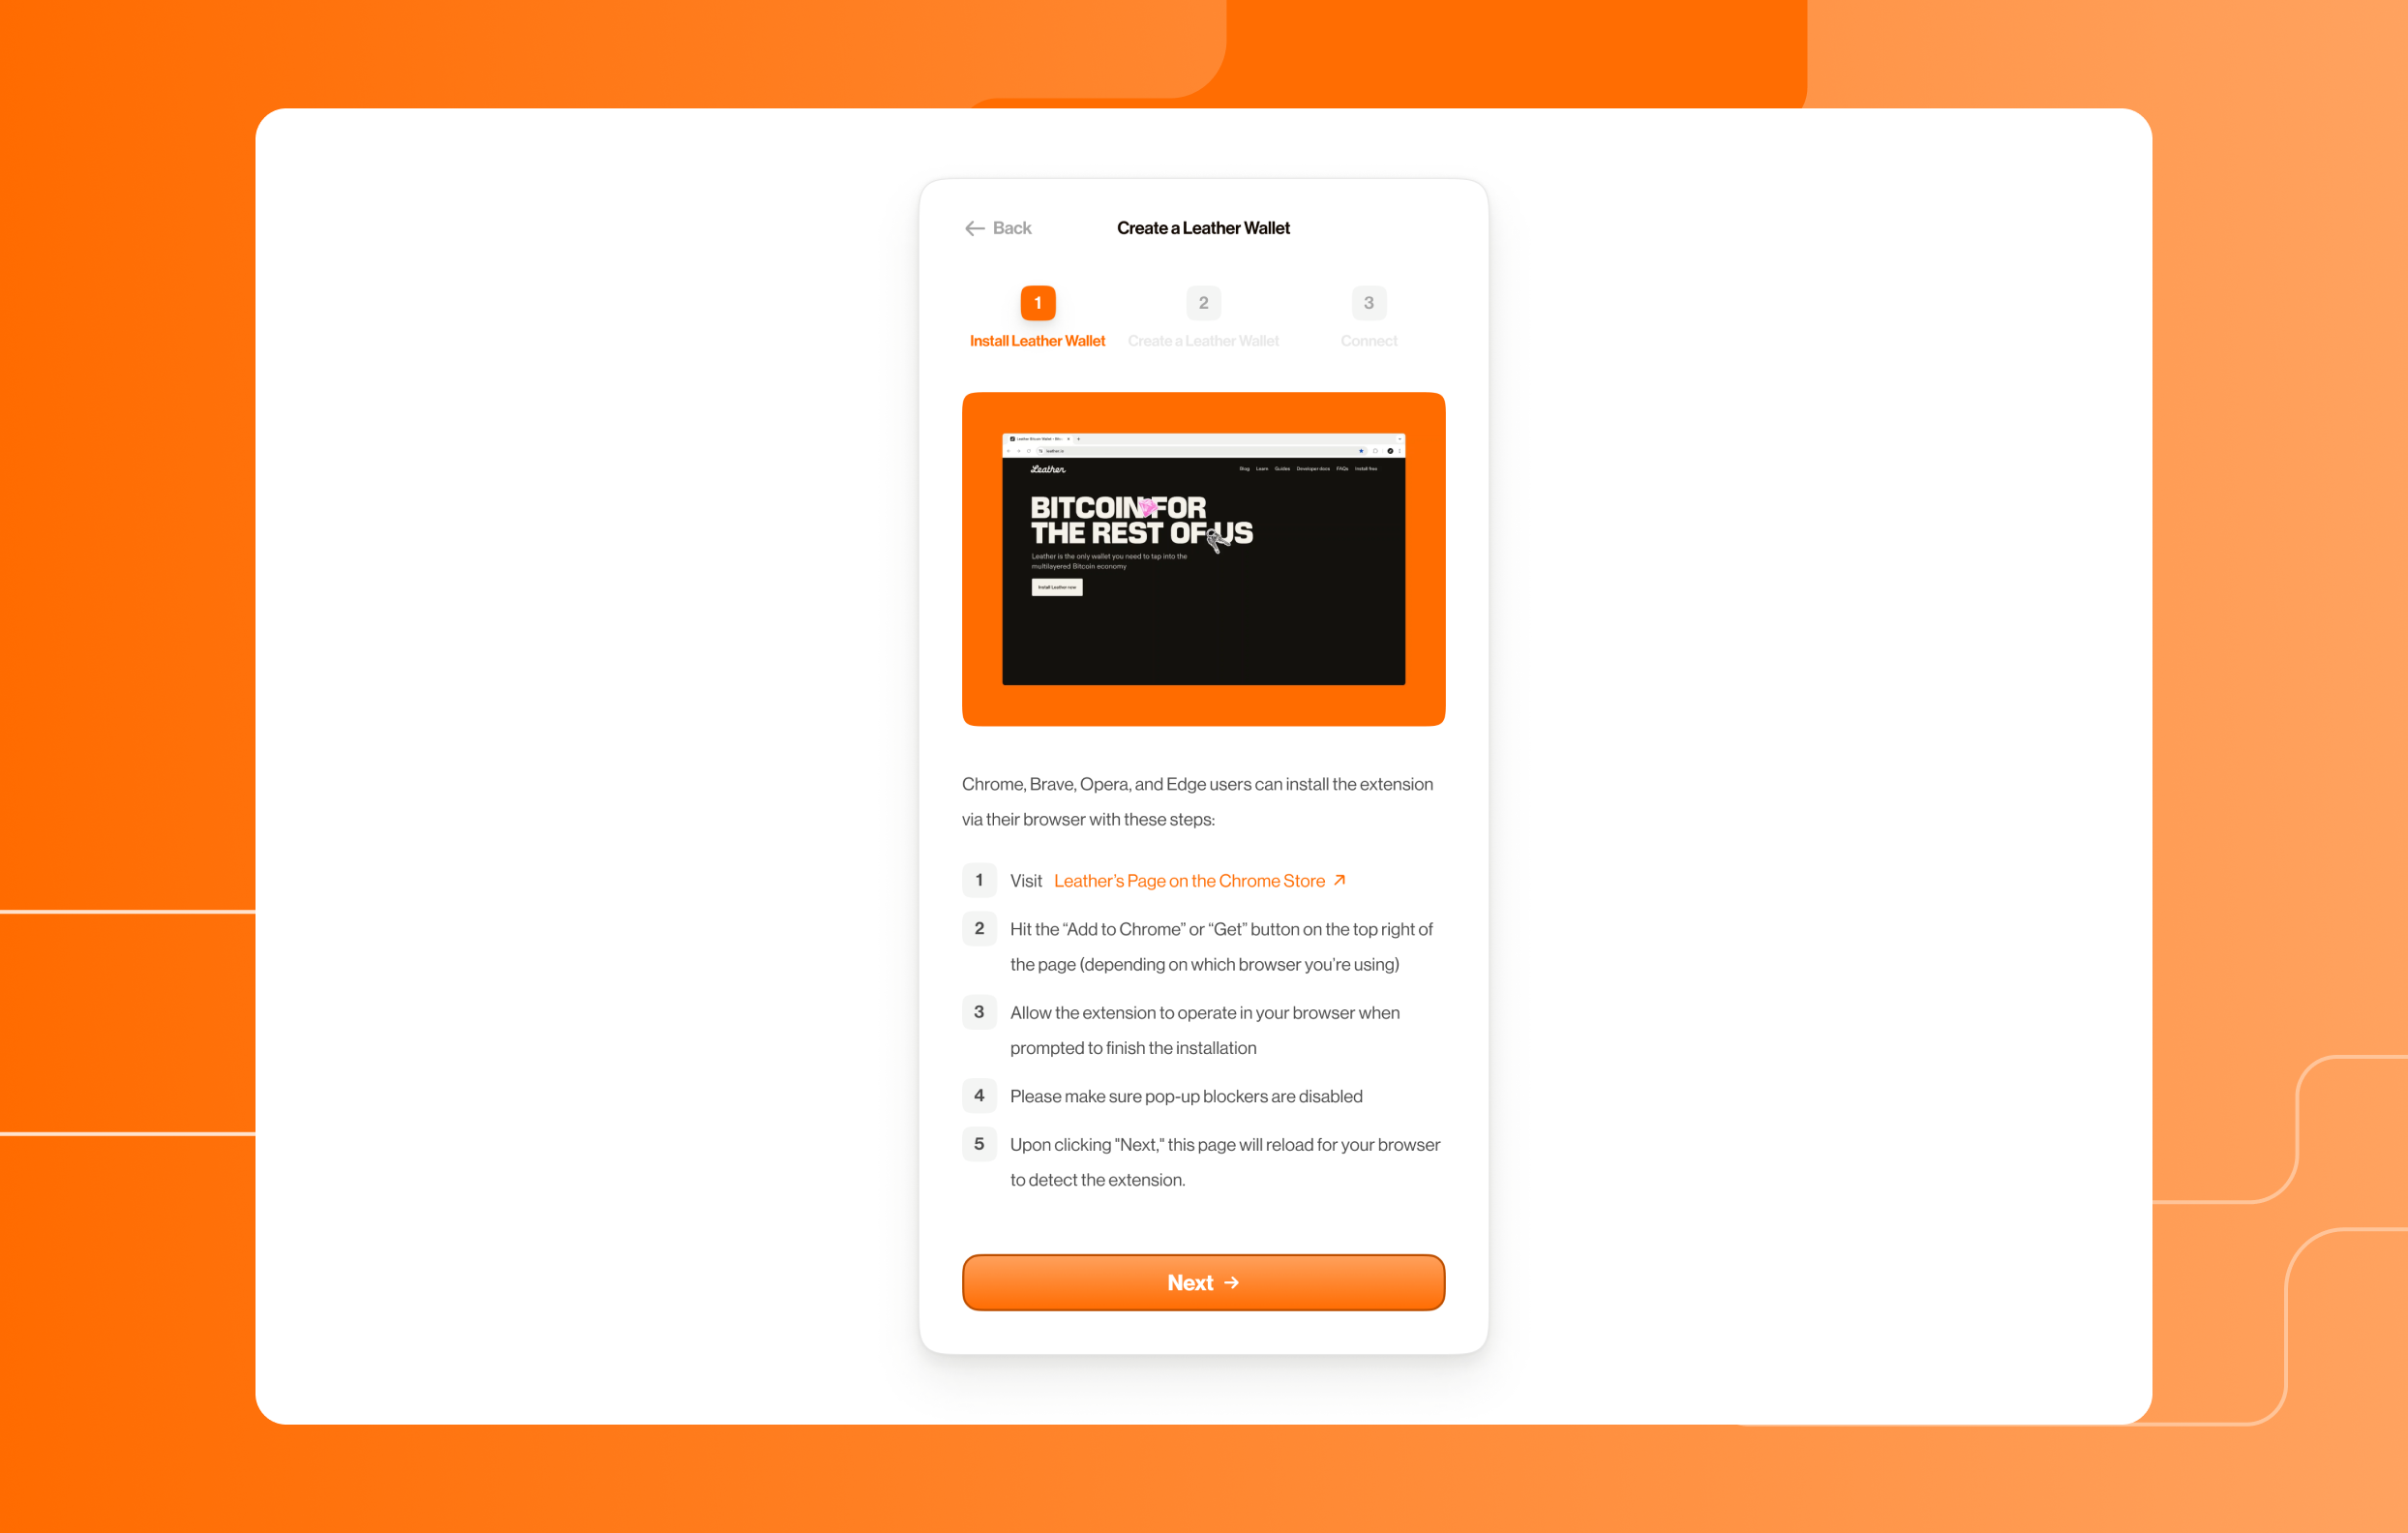
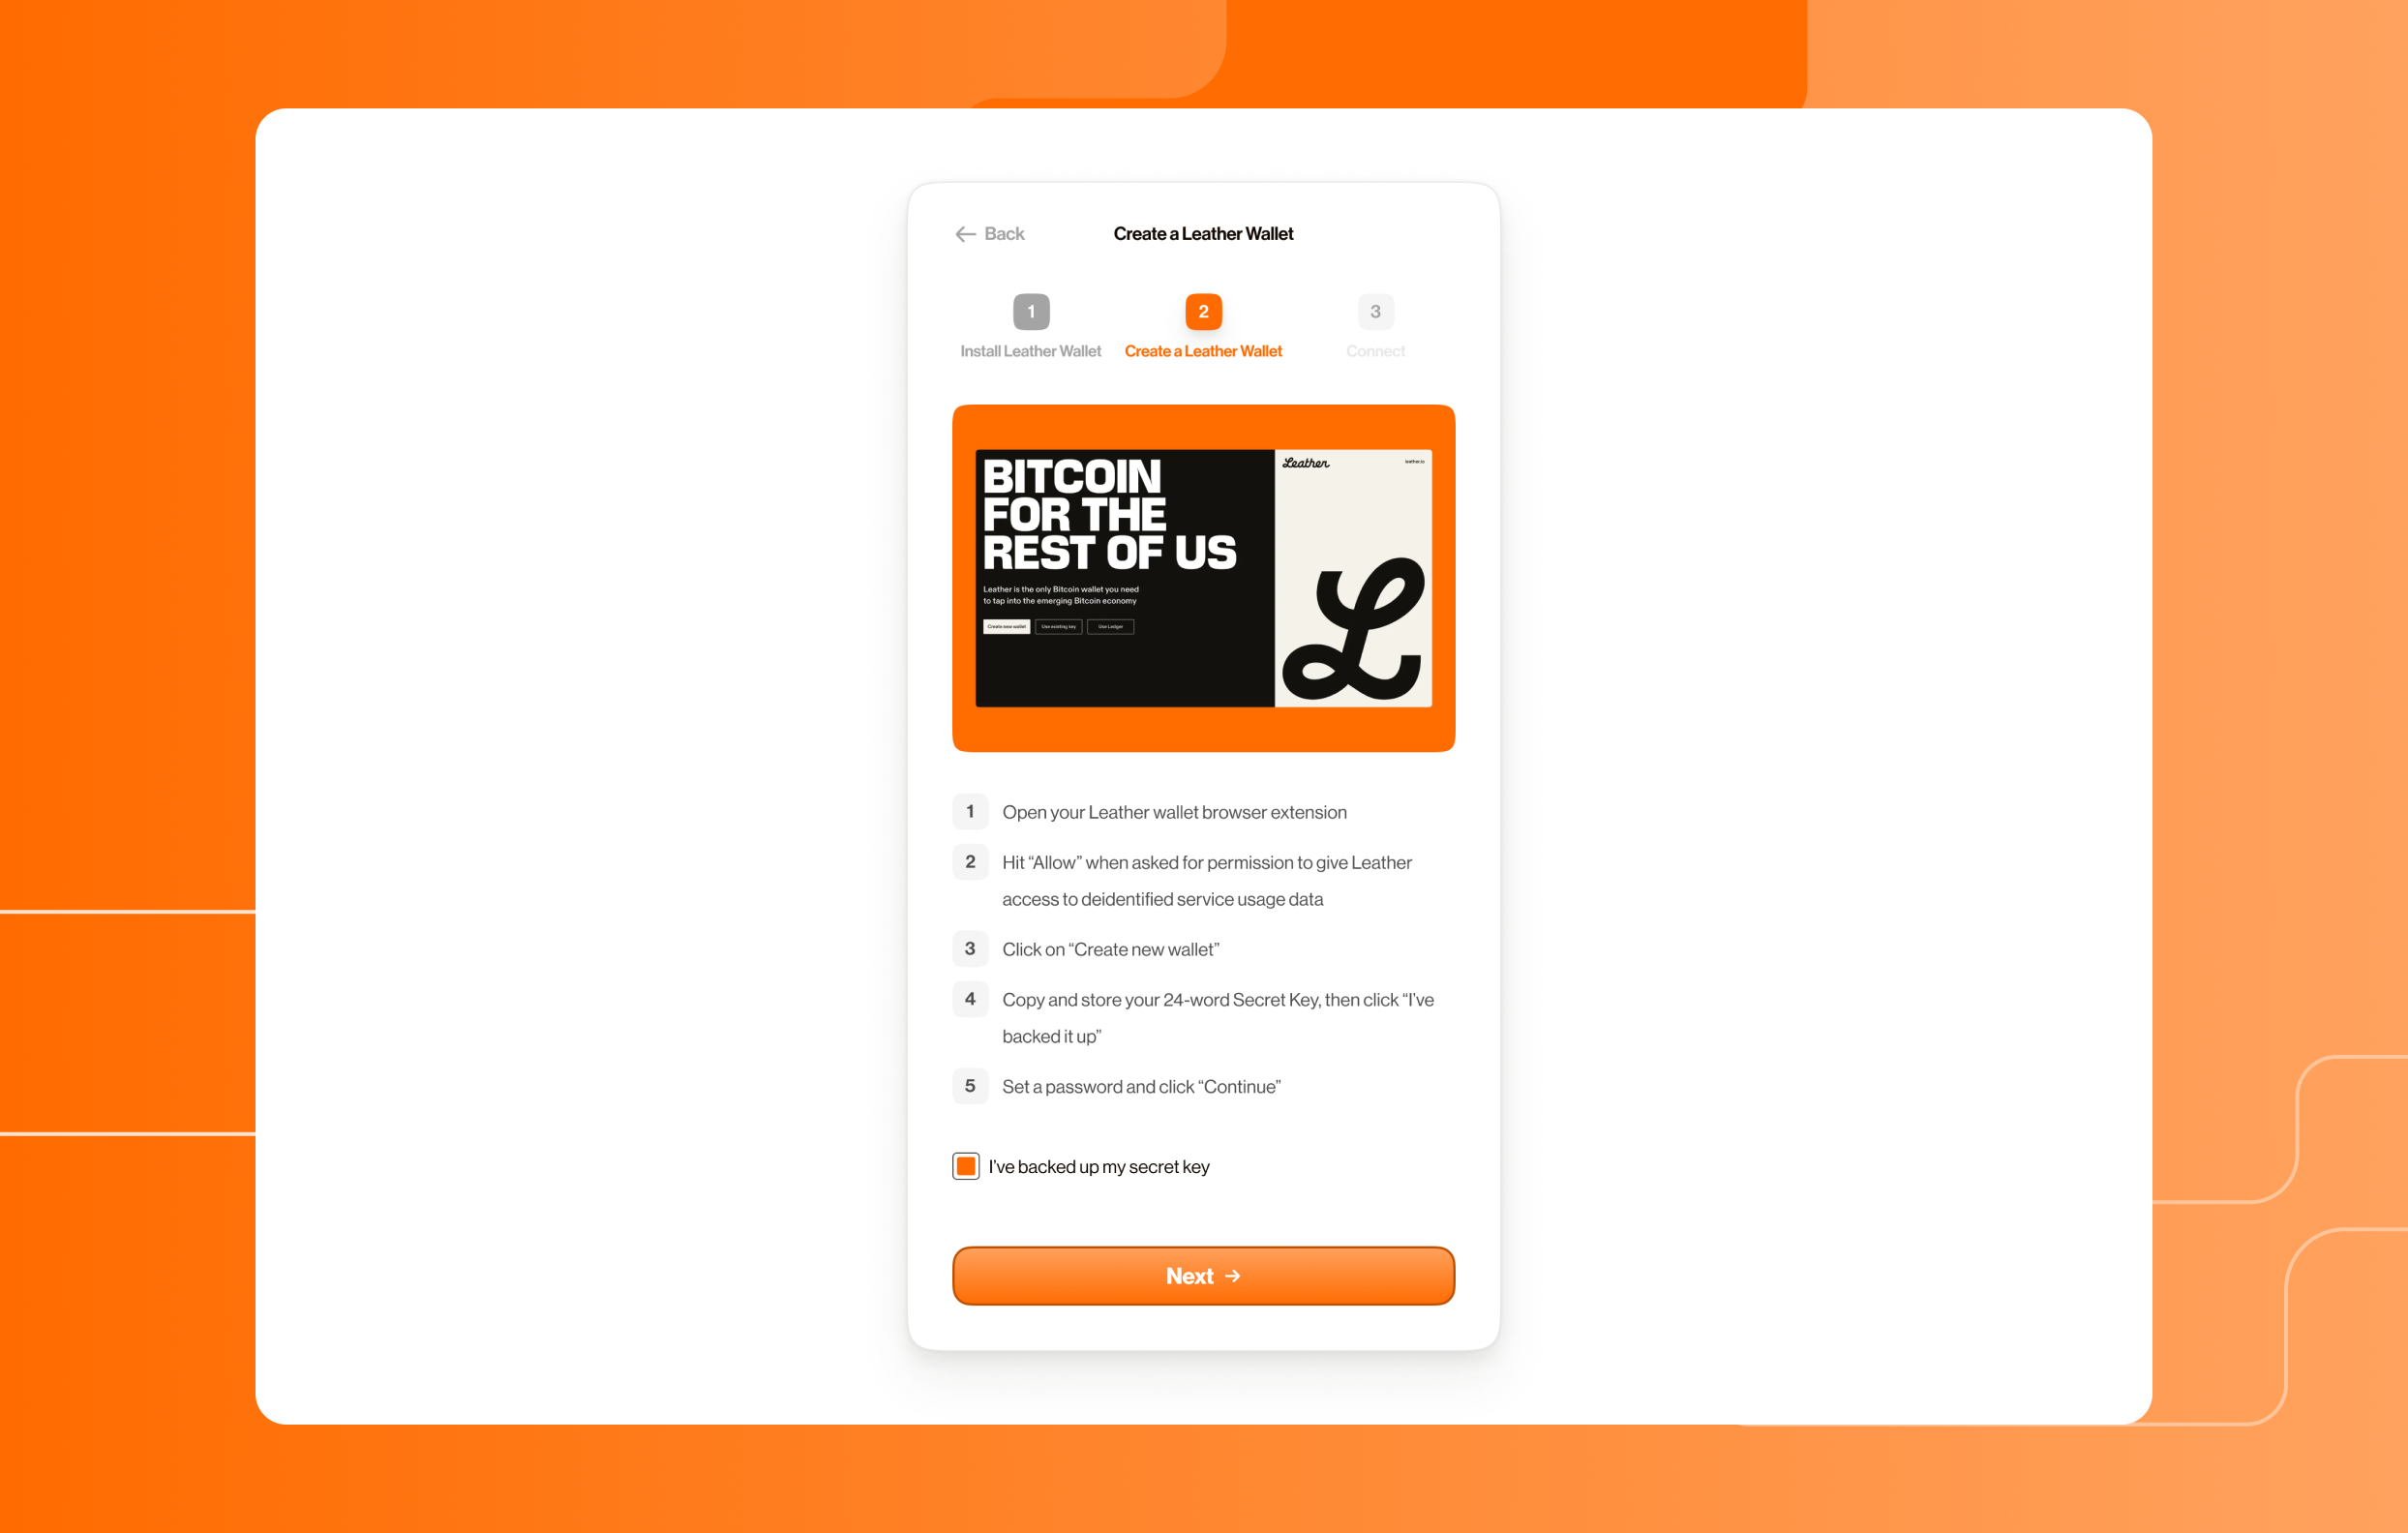
During the process of claiming your Web3 digital identity, users who don’t have a Bitcoin-compatible wallet will be guided through a process to set up a Leather wallet. Leather is the default Bitcoin wallet offered to new .locker users to serve as their starting point into Web3.
After registering a .locker domain name with an ICANN-accredited domain registrar, you’ll receive an email asking you to claim your Web3 digital identity. Click on the link in that email to create an account, set up your digital wallet, and claim your Web3 digital identity.
Paragraph.com is a publishing platform built for Web3.
Paragraph.com is a publishing platform built for Web3, which allows writing and ownership to live in the same place. Instead of publishing a post and then figuring out monetization separately, creators can run crowdfunds, sell editions, auction work, and split proceeds, all as part of the same piece of content. For .locker users, it's one of the cleaner ways to put your digital identity to work in public. Your digital identity is connected to what you publish, what you fund, and what you collect.
Paragraph has documentation on how to get started. You can sign up with an email address, Farcaster, or a digital wallet. Connecting a digital wallet allows you to collect earnings and rewards.
On publishing platforms, a post is just a post. On Paragraph, some content includes on chain actions like minting an edition, backing a crowdfund, or participating in an auction. When that happens, a digital wallet signature is involved and, sometimes, a small network fee. That's not the platform charging you arbitrarily. That's how on chain transactions work.
Splits are worth understanding before you use them. A split doesn't just send money somewhere; it routes value across multiple recipients. If you're expecting one destination and the creator set up a split, that's working as intended.
These are the moments that feel broken but aren't:
"I published, but there's no edition showing up."
Publishing and minting are separate steps. If an edition is part of the post, there's an onchain action required after publishing.
"Why am I being asked to sign something for a basic action?"
If the action touches ownership, funding, or value routing, a signature is normal. It's not basic in web3 terms, even if it looks like a regular button click.
"Why did this cost money?"
Network fees apply to onchain transactions. The platform isn't charging you, the network is processing the action.
When you connect your digital wallet to Paragraph, your .locker name can appear in place of your digital wallet address, on your profile, on editions you've collected, and on anything you publish. How consistently it shows depends on whether ENS reverse resolution is set and whether the app reads it. If your name isn't appearing where you expect it, that's usually a resolution setting.
This user guide is to assist you in using .locker with Rainbow Wallet.
This user guide is to assist you in using .locker with Rainbow Wallet.
Rainbow Wallet uses the ENS resolver and it properly resolves .locker names at the protocol level. This means that you may not see .locker names autopopulate or appear in recipient previews. If a .locker name has a valid digital wallet address associated with it, sending funds resolves to the correct address onchain.
Despite this, transactions are executed correctly as long as the correct blockchain network and digital asset are selected. This is known digital wallet UI behavior and does not affect onchain resolution. It is actively being addressed by the Coinbase and ENS teams.
Before sending funds, verify the resolved address. Once you send funds onchain, you cannot reserve the transaction. It’s important that you confirm they are being sent to the correct address.
For a full explanation of ENS resolution vs wallet UI behavior across wallets, see our FAQ article on using .locker with digital wallets.
using-locker-with-trust-wallet
This user guide is to assist you in using .locker with Trust Wallet.
Trust Wallet uses the ENS resolver and it properly resolves .locker names at the protocol level. This means that you may not see .locker names autopopulate or appear in recipient previews. If a .locker name has a valid digital wallet address associated with it, sending funds resolves to the correct address onchain. Despite this, transactions are executed correctly as long as the correct blockchain network and digital asset are selected. This is known digital wallet UI behavior and does not affect onchain resolution. It is actively being addressed by the Coinbase and ENS teams.
Before sending funds, verify the resolved address. Once you send funds onchain, you cannot reserve the transaction. It’s important that you confirm they are being sent to the correct address.
For a full explanation of ENS resolution vs wallet UI behavior across wallets, see our FAQ article on using .locker with digital wallets.
This user guide is to assist you in using .locker with the Coinbase Wallet browser extension.
This user guide is to assist you in using .locker with the Coinbase Wallet browser extension.
Coinbase Wallet Extension uses the ENS resolver and it properly resolves .locker names at the protocol level. If a .locker name has a valid digital wallet address associated with it, sending funds resolves to the correct address on-chain.
This means that the Coinbase Wallet Extension may not autopopulate or appear in the recipient preview. Instead, you may see the long, complex digital wallet address that is associated with your .locker. Despite this, transactions are executed correctly as long as the correct blockchain network and digital asset are selected. This is known digital wallet UI behavior and does not affect onchain resolution. It is actively being addressed by the Coinbase and ENS teams.
Before sending funds, verify the resolved address. Once you send funds on-chain, you cannot reserve the transaction. It’s important that you confirm they are being sent to the correct address.
For a full explanation of ENS resolution vs wallet UI behavior across wallets, see our FAQ article on using .locker with digital wallets.
This user guide shows how to send Ethereum in MetaMask digital wallet with a .locker name.
This user guide shows how to send Ethereum in MetaMask digital wallet with a .locker name. MetaMask resolves .locker names through the ENS resolver. Think of this as a phone book to look up an address.
Please Note: Setting an ENS primary name is not required for sending funds. Primary names are only required for dApps that display identities.
Go to your main account screen.
Press the "Send" button to open the transfer flow.
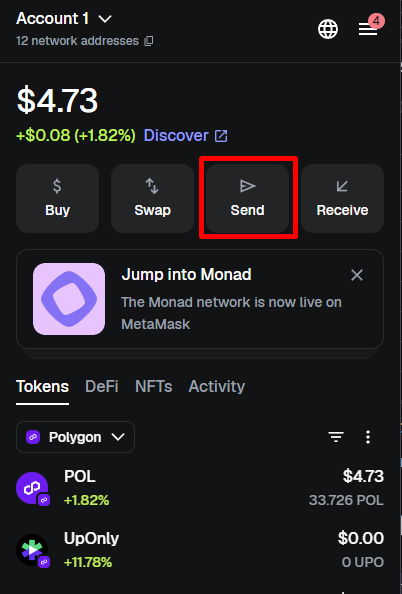
Choose Ethereum from your list of assets.
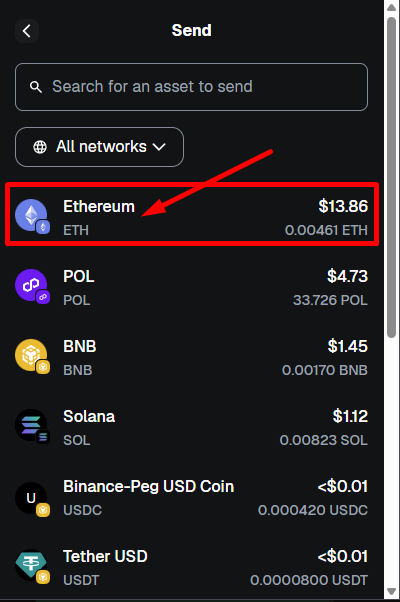
In the “To” field, type the .locker name to send ETH to (example: don.locker). MetaMask will automatically detect it, resolve it via the ENS resolver, and show the correct ETH address associated with the .locker name.
You will see something like this:
don.locker
0xB1598…5C17E
Address resolved via Ethereum Name Service

Type the amount of ETH you want to send in the "Amount" box and click "Continue."
You will see a confirmation screen that includes:
If everything is correct, confirm the transaction.

The ETH is now sent to the address behind the .locker name.
Do I need to set an ENS primary name before I can send ETH using my .locker name?
No. MetaMask uses the ENS resolver directly and resolves .locker names without needing a primary name. Primary names are only for dApps that display identities.
Why does MetaMask recognize .locker names?
MetaMask recognizes .locker names because .locker is integrated with the ENS resolver.
What if my name does not resolve?
Make sure your .locker name has an Ethereum address record set in your profile on my.locker.
Can I send tokens other than ETH?
Yes, Any asset supported by MetaMask can be sent to a .locker name as long as the recipient address supports that token.
You will need to set your ENS primary name to use most Ethereum dApps. Setting your ENS Primary Name will ensure that your .locker name is shown in dApps that use the ENS resolver.
Note that an ENS Primary Name is different from your .locker app Primary Name. A primary name in the .locker app is the main .locker digital identity you will use for transactions. Setting your ENS primary name allows you to use your .locker name with Ethereum apps and digital wallets.
This will make your desired .locker name your default on Mainnet.
If your primary name is properly set, you will see your .locker name instead of the standard digital wallet address in dApps that use ENS.
The ENS app shows "invalid name" or "no eligible names", or the "Set as a primary name" button is greyed out.
Try: reconnecting your digital wallet or refreshing the page. Because .locker names are stored offchain with ENS, it can take a few minutes to sync.
Your .locker name was set successfully, but still doesn't appear on an Ethereum dApp.
Try: waiting a while and trying again to give the resolver and the blockchain time to sync. If it still doesn't work, confirm that the dApp is integrated with the ENS resolver. If the dApp isn't integrated with the ENS resolver, it is incompatible with .locker. The most popular dApps should not have this problem.
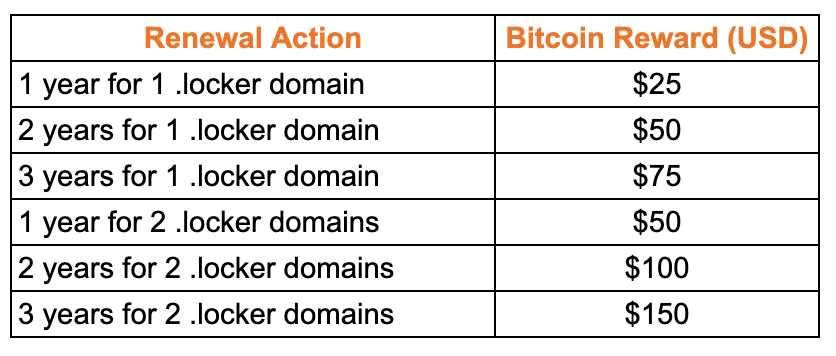
For a limited time, .locker is offering Bitcoin rewards for renewing a .locker domain name. Below is everything you need to know about the Bitcoin reward and who to contact for help.
For a limited time, .locker is offering Bitcoin rewards for manually renewing a .locker domain name. Below is everything you need to know about the Bitcoin reward and who to contact for help.
Registrants of a .locker domain name that renew their domain with their registrar and claim their Web3 digital identity are eligible for a Bitcoin reward. After renewing your domain name, your Bitcoin reward will be sent directly to your digital wallet.
Yes, there are some essential details you need to be aware of.
Every .locker domain name qualifies for $25 USD in Bitcoin as long as you meet the above criteria. If you have multiple domain names, every .locker domain name can be renewed for the reward. Additionally, every year of renewal qualifies for a $25 in Bitcoin reward. See below for reward examples.
Yes! We need a digital identity that’s attached to a digital wallet in order to send you Bitcoin! We make it easy for you to configure a new digital wallet with Leather. It just takes a few clicks and then you’ll be on your way to receiving Bitcoin. If you haven’t claimed your digital identity yet, you will receive a link to do so in your registrant email inbox.
You should receive an email to claim your digital identity within a few hours after registration. If you don’t see the email, please check your spam folder before contacting support. The email will come from .locker and not your domain registrar.
In addition to the Help Center, .locker has its very own support team to assist with claiming your .locker digital identity, managing your digital identity, and troubleshooting on the .locker dashboard.
Your domain registrar or reseller can only help with managing your domain name or website. Management of your domain name would include tasks such as registering a .locker domain, domain renewals, or managing DNS records.
.locker handles anything to do with your digital identity, including claiming your identity, Bitcoin rewards, and management of your identity within the .locker app. If you experience issues with claiming your .locker digital identity, please reach out to .locker’s support team.
Visit Leather’s website for Leather wallet support, guides, and more.
If you are using a Ledger device with Leather, authentication on app.my.locker requires that both the Bitcoin and Stacks networks are enabled in your wallet.
If you are using a ledger device with Leather, authentication on app.my.locker requires that both the Bitcoin and Stacks networks are enabled in your wallet.
The Stacks app on the ledger doesn't share a Bitcoin address with linked applications by default. Your .locker identity's security is anchored on Bitcoin; therefore, in order for the login procedure to happen successfully, it requires your Bitcoin address. You will see an authentication error notice if the signature fails due to Bitcoin being disabled. Only ledger users face this problem; no problem is caused for either Leather or Xverse users.
1. Open your ledger and the Leather app
2. Support Both Bitcoin And Stacks In Leather
3. Return to app.my.locker and attempt to sign in. If you still see an error after enabling both networks, contact support and share a screenshot so we can help.
You can update your .locker zone files for Bitcoin and Ethereum in the .locker app.
You can update your .locker zone files for Bitcoin and Ethereum in the .locker app. Blockchains do not use traditional DNS zone files, but they do have a similar mechanism on BNS and ENS to represent your information onchain. There are no gas fees for updating your .locker zone file.
Navigate to the .locker app dashboard and locate the “Zone File Updates” button at the bottom of the page. Click the grey arrow to open the zone file options.

You may add a bio, website, location, name, and X account to your zone file records. These data points will be public and onchain. Click the Edit button to proceed.
Enter your updates in the text boxes. When finished, be sure to verify your information before proceeding. You must confirm verification before you can save your updates. Once confirmed, click the orange save button.
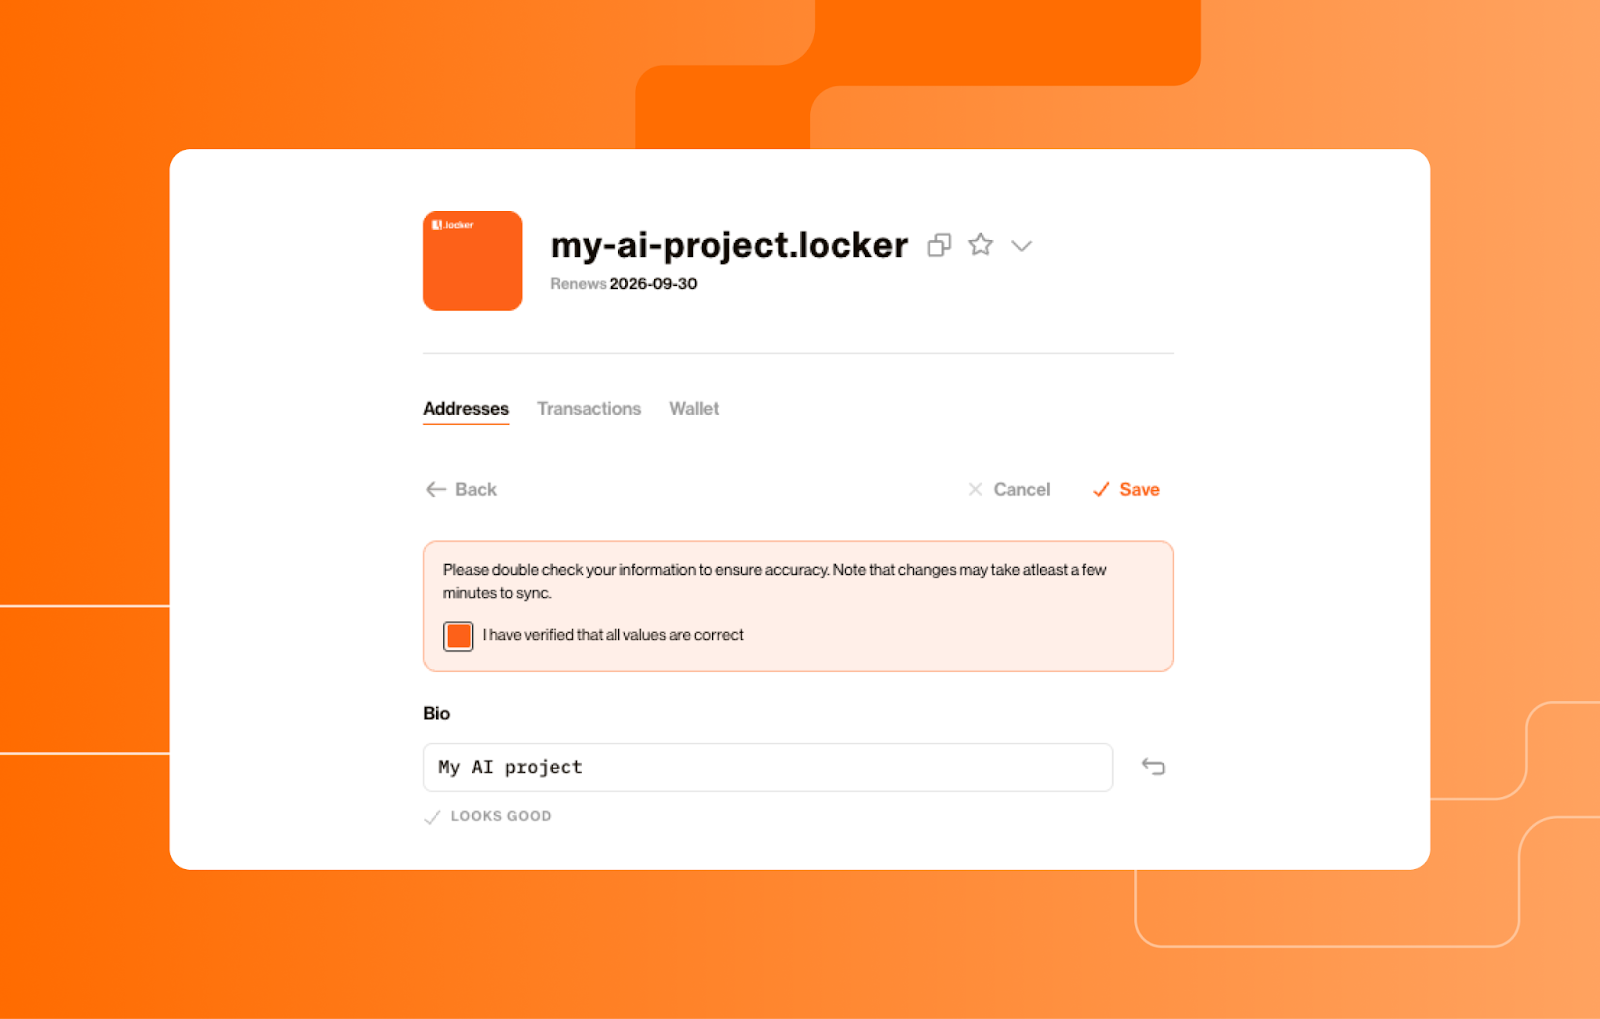
Once saved, zone file updates will enter a pending state. This is normal. When the zone file update is complete, you will see the transaction in your “Transactions” tab.

I don’t see my zone file update in the Transactions tab, even after waiting a while.
Try:
If you still do not see your zone file update in the Transactions tab, contact the .locker support team with the following information:
After registering your .locker domain name, you will receive an email containing a link to claim your .locker digital identity. If your link is broken, this guide can help you troubleshoot.
After registering your .locker domain name, you will receive an email containing a link to claim your .locker digital identity. If your link is broken, this guide can help you troubleshoot.
Security and safety are top priorities for .locker. Never forward your emails from .locker to anyone, not even our support team! That link is unique to your .locker digital identity and sharing it opens you up to theft and impersonation.
Open the digital identity link in an up-to-date version of your browser. Also be sure that your browser is compatible with the .locker app. Compatible browsers include Chrome, Brave, Edge, and Opera.
If your email client allows you to view the full original link, copy and paste that link into your browser. This will help prevent any URL rewriting.
Avoid in-app browsers from email apps. Always use your system browser.
If you see any of the following messages, try the suggested solution.
A 404 page or blank page- make sure you’re using a compatible browser, have popups enabled, and are within the 14 day digital identity claiming period.
A “token replaced” message- a newer link has been sent in a reminder email. Use that new link to claim your digital identity.
An “invalid or expired token” message- the link is no longer valid. Contact our support team to get a replacement link.
.locker has a support team that can help you with your digital identity. Contact us here and include the following information:
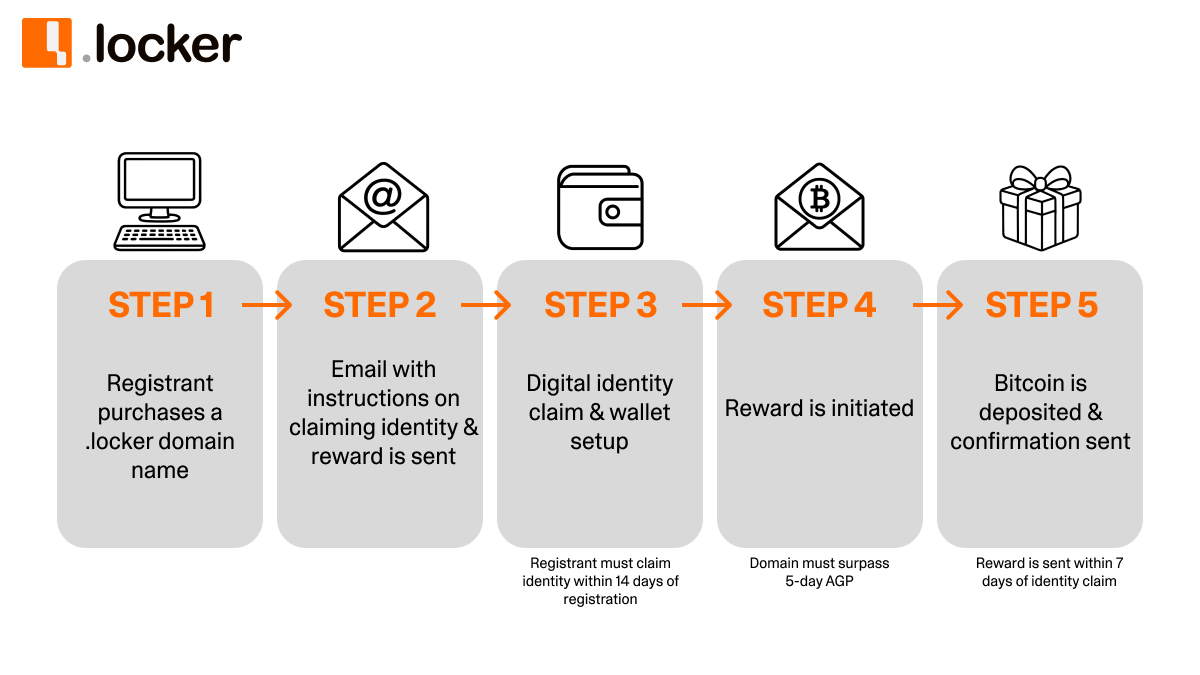
.locker offers a Bitcoin reward to domain registrants who claim their .locker digital identity.
.locker offers a Bitcoin reward to domain registrants who claim their .locker digital identity. Below is everything you need to know about the Bitcoin reward and who you need to contact if you need help.
Registrants of a .locker domain name who claim their .locker digital identity qualify for a Bitcoin reward. After domain registration, you will receive an email from .locker with your magic link to mint your .locker digital identity on the Bitcoin blockchain. Registrants must complete this identity claiming process within 14 days of registration. Once completed, we will initiate the reward to be sent to your new .locker digital wallet.
View .locker's step-by-step user guide on how to claim a .locker digital identity here. You will receive a magic link in your email to initiate the claiming process.
Yes, there are a few essential things you need to know about the Bitcoin reward.
Consider the following timeline. You register a .locker domain name on Day 0. You also claim your digital identity on day 0. This does not immediately make you eligible for the Bitcoin reward. Your domain name still needs to surpass five days of registration before you are eligible for the reward and we can initiate the transaction. By Day 6, you will become eligible and by the end of Day 7, you will receive the reward in your wallet.
A second scenario would be this. You register a .locker domain name on Day 0, but you wait until Day 6 to claim your digital identity. Your domain name has surpassed the five day waiting period, so you immediately become eligible for the reward upon claiming your digital identity. You should expect to receive a transaction initiation email and a confirmation email for the Bitcoin deposit by day 13, or seven days after claiming your digital identity. Usually, we are able to deposit your Bitcoin well before the seven days are complete.
You may see references to the 5-day AGP in your registrar’s terms and conditions for the Bitcoin reward. The 5-day AGP refers to the Add Grace Period for domain registrars, where they have 5 days after the initial domain registration to reverse a domain registration without a fee. This is a standard practice for ICANN-accredited domain registrars and resellers. Your .locker domain registration must surpass the 5-day AGP as a condition to receiving the Bitcoin reward.
Yes! We need a digital identity that’s attached to a digital wallet in order to send you Bitcoin! We make it easy for you to configure a new digital wallet with Leather. It takes just a few clicks to get set up, and then you will be well on your way to receiving your Bitcoin.
You will receive email updates about the status of your reward. After claiming your digital identity, you will receive an email when your Bitcoin reward is initiated. You will also receive a final confirmation email when the Bitcoin is deposited into your digital wallet. Note that these emails will come from .locker and not your domain registrar or reseller.
If you do not receive any of these emails, please check your spam folder before contacting support.
You should receive an email to claim your digital identity within a few hours after registration. If you don’t see the email, please check your spam folder before contacting support. The email will come from .locker and not your domain registrar.
In addition to the Help Center, .locker has its very own support team to assist with claiming your .locker digital identity, managing your digital identity, and troubleshooting on the .locker dashboard.
Your domain registrar or reseller can only help with managing your domain name or website. Management of your domain name would include tasks such as registering a .locker domain, domain renewals, or managing DNS records.
.locker handles anything to do with your digital identity, including claiming your identity, Bitcoin rewards, and management of your identity within the .locker app. If you experience issues with claiming your .locker digital identity, please reach out to .locker’s support team.
Visit Leather’s website for Leather wallet support, guides, and more.
You can add an Ethereum digital wallet address to the .locker app.
You can add an Ethereum digital wallet address to the .locker app. This allows you to use your .locker digital identity with apps that use the Ethereum Naming System (ENS) resolver, like MetaMask or Uniswap. There are no gas fees for .locker names!
In the .locker app dashboard under the “Addresses” tab, scroll down to find the Ethereum Address section. Click “Add an Address.” Enter your Ethereum address in this box and click “Add.” Follow the prompts to sign the transaction.

Try the below tips and tricks to help resolve any setup issues.
The address is shown as invalid.
Try:
The address is not recognized as yours.
Try:
I get a duplicate address error.
Try:
I didn’t receive a confirmation after adding the address.
Try:
My transaction or signature fails when trying to add my Ethereum address.
Try:
Need more assistance? Contact our support team! Be sure to include:
You can connect an Ethereum digital wallet address to the .locker app.
You can connect an Ethereum digital wallet address to the .locker app. This allows you to use your .locker digital identity with digital wallets that use the Ethereum Naming System (ENS) resolver, like MetaMask or Phantom. There are no gas fees for .locker names!
In the .locker app dashboard under the “Addresses” tab, scroll down to find the Ethereum Address section. Click the plus sign next to the Ethereum Address section.
Click “Connect Wallet” to initiate the configuration with your digital wallet provider. You will be able to choose from a variety of digital wallets that are compatible with the ENS resolver. Choose your provider and follow the prompts to sign the transaction.

When connected, you will receive a confirmation modal. Your Ethereum address will be visible in the .locker app’s dashboard.
Try the below tips and tricks to help resolve any setup issues.
Digital wallet is not detected in the connect window.
Try:
Nothing Happens when clicking connect or the plus icon.
Try:
Digital wallet pop-up does not appear.
Try:
I connected the wrong digital wallet or account.
Try:
My transaction fails or gets stuck when approving the connection.
Try:
I received an error mentioning RPC, chain ID, or provider issues.
Try:
Need more assistance? Contact our support team! Be sure to include:
Learn how to access your Web3 digital identity in the .locker app.
Users can access their Web3 digital wallet from the .locker app itself once they have connected their wallet to .locker.
.locker's step-by-step guide will help you transfer your digital identity.
Allow users to transfer their.locker identity (NFT) to a new account or wallet in a secure and verifiable manner.
Critical Criteria
Kindly note that this process transfers only the Web3 NFT identity. The registrant email can be updated but only via the web2 registrar.
Transfer Process
Start the Transfer:

Confirm Transfer Intent:
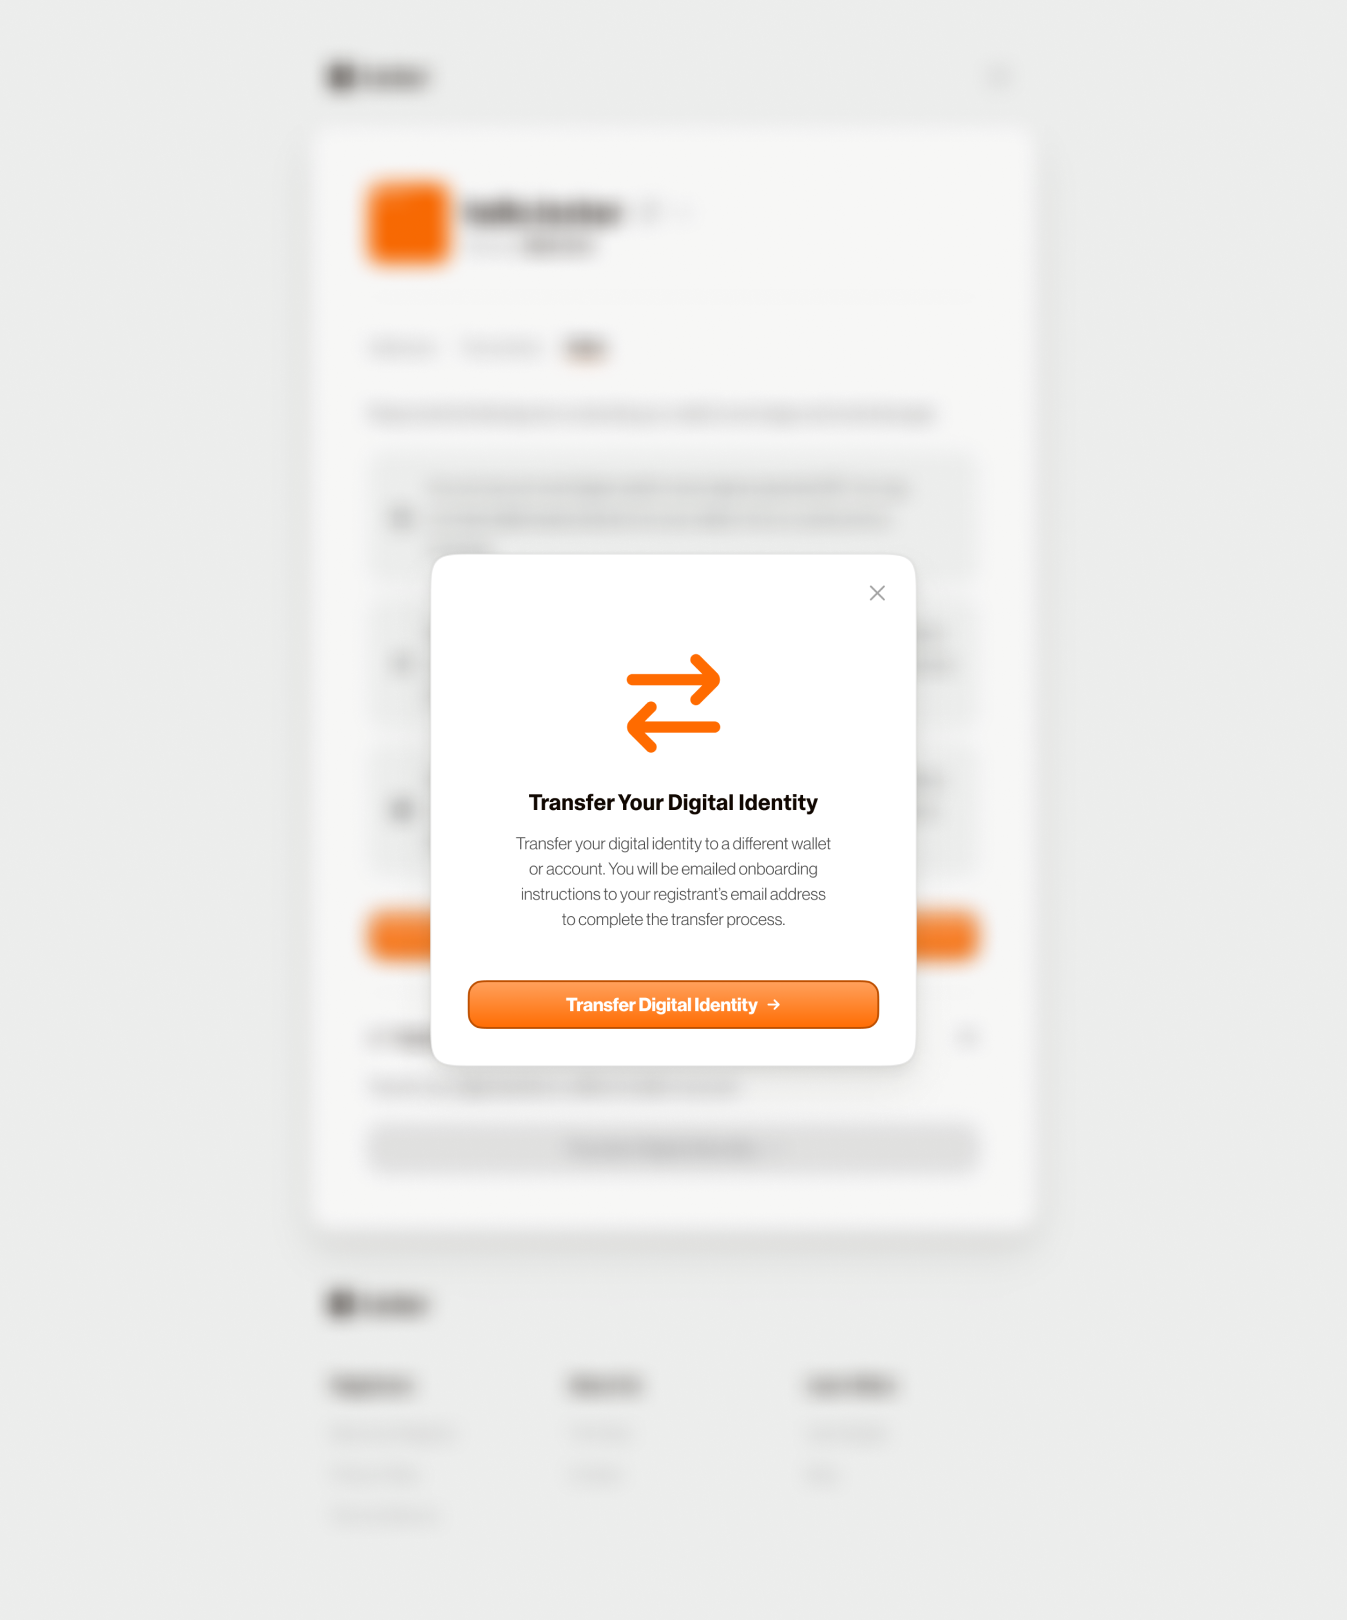
Get Transfer Link:
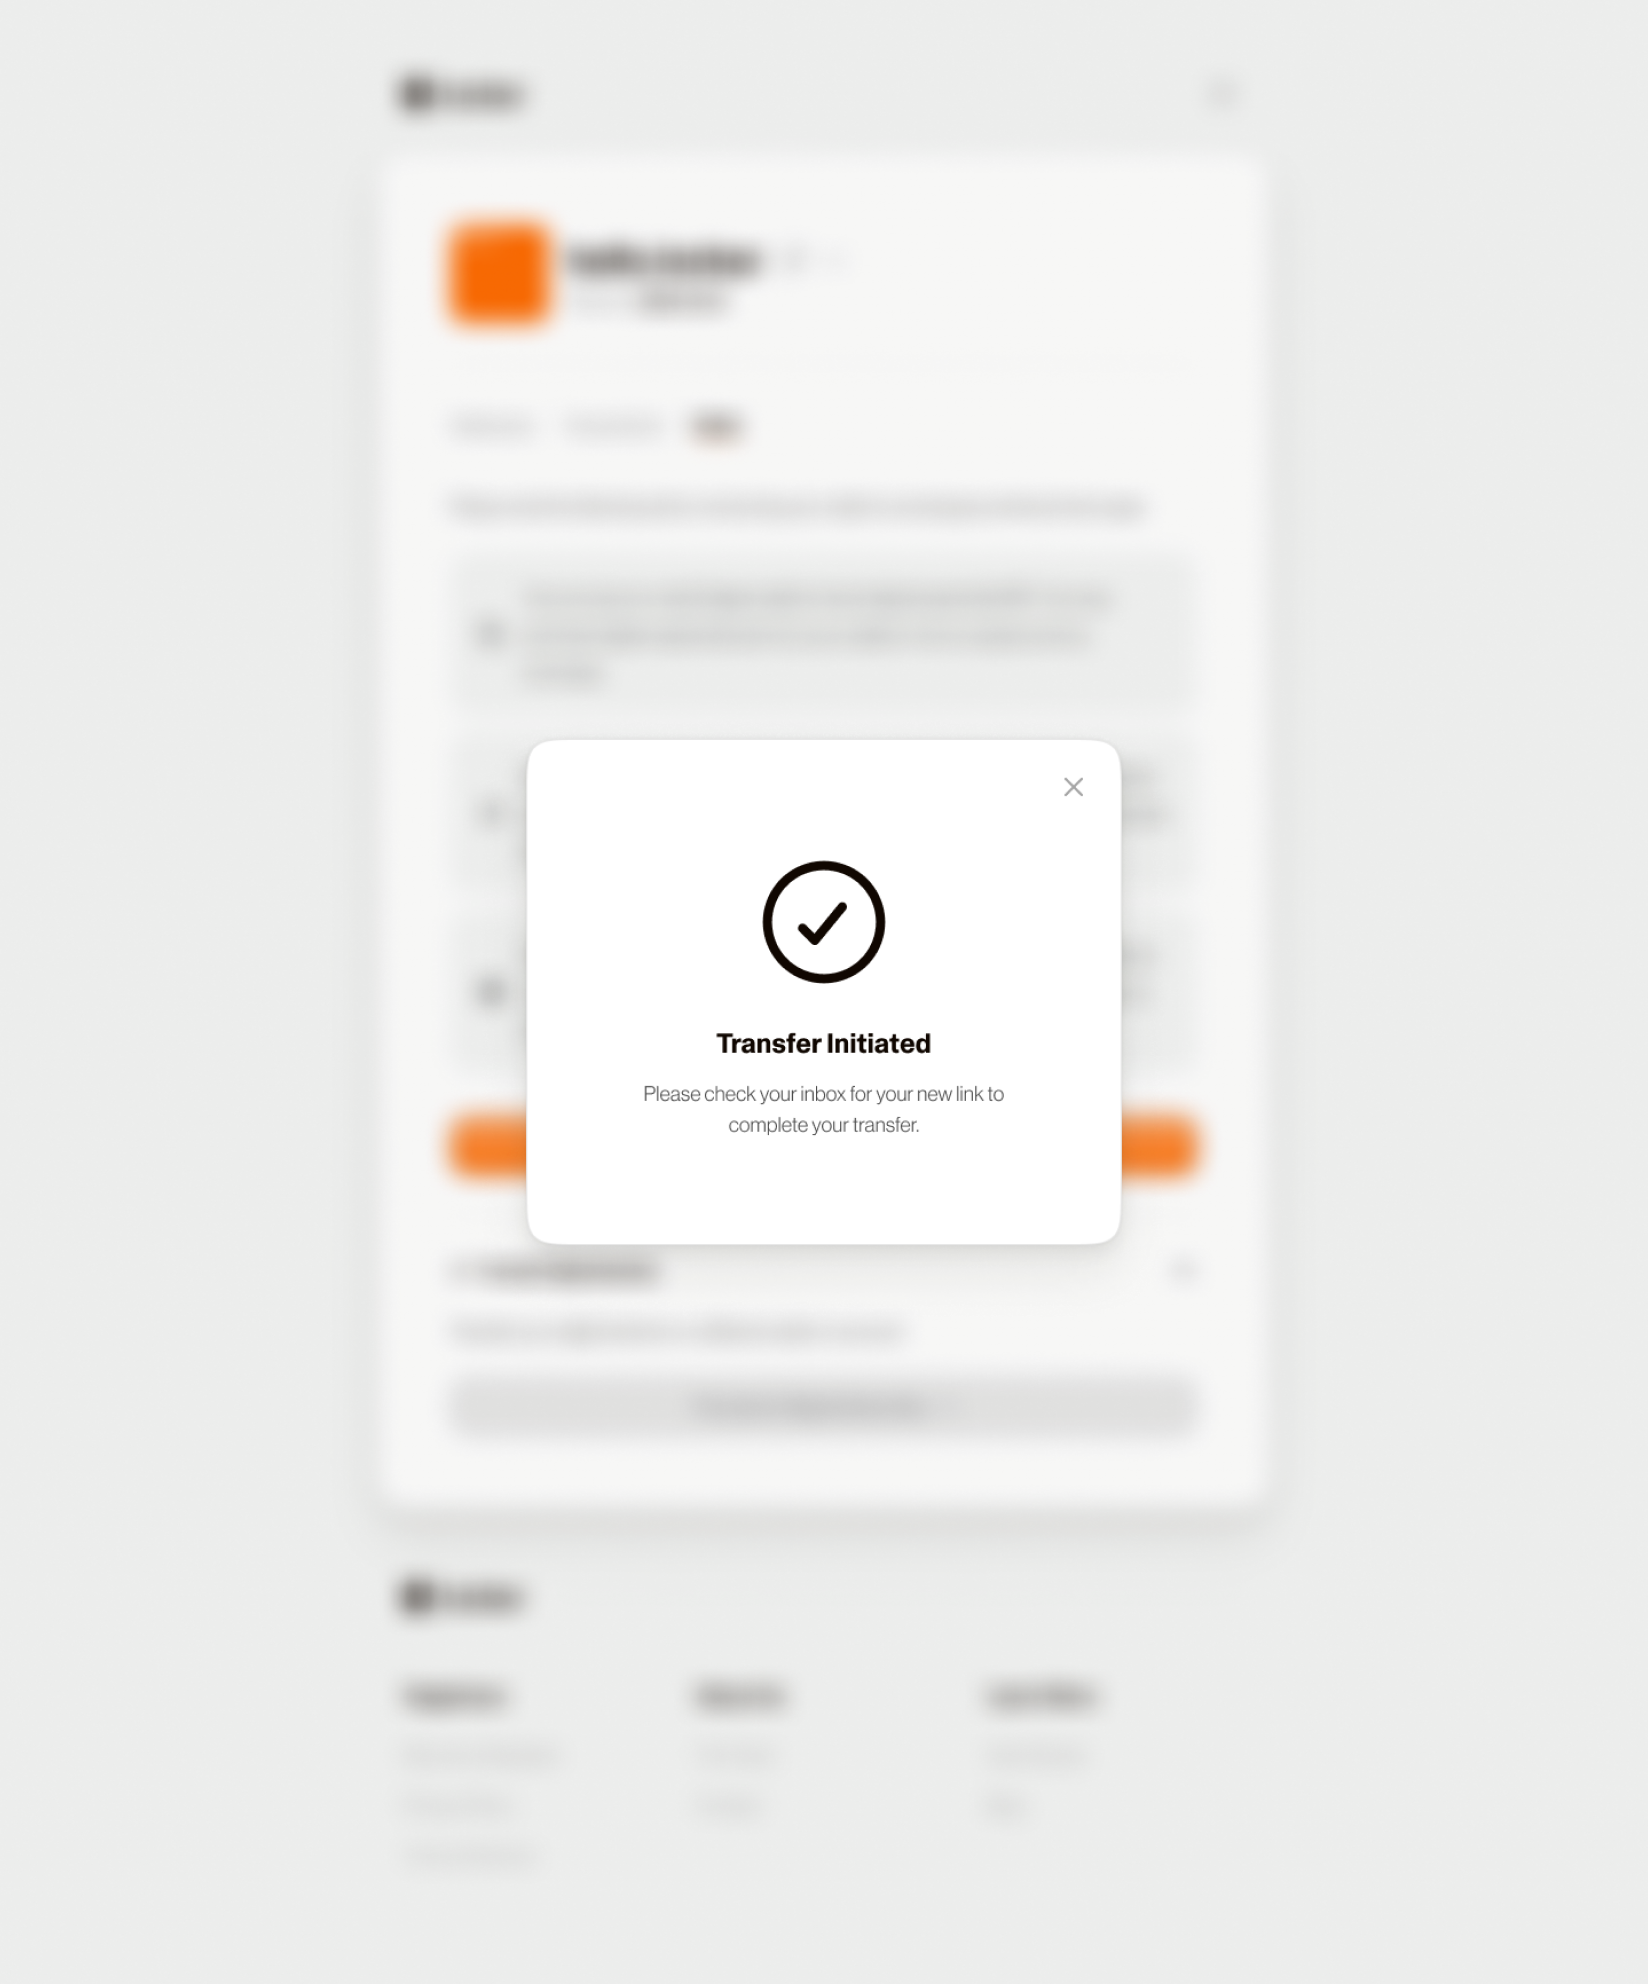
Verify Email Ownership:
Click "New Wallet" and Confirm Verification:
Complete the Transfer:
This transfer flow involves two significant ownership verification steps:
No Effect on Current Functionality: It's an added functionality, and it will not have any effects on the rest of your.locker account.
Via wallet verification and email, the process is realized with a safe and standardized connection between Web2 and Web3 identity.
Note
In case the transfer option is not available right after claiming your .locker identity
Wait for one Bitcoin block (approximately 30 minutes) after claiming your.locker identity successfully to activate the transfer option. This is to make sure that the processing and verification are done in full. Once the time is up, the transfer option unlocks on your.locker dashboard.
Learn how to copy your Web3 digital identity in the .locker app.
.locker was created to help users claim a human-readable name that they can then use to conduct transactions and connect to applications on the Bitcoin and Ethereum networks. As such, .locker also gives users the ability to copy their digital identities to quickly share with other users.

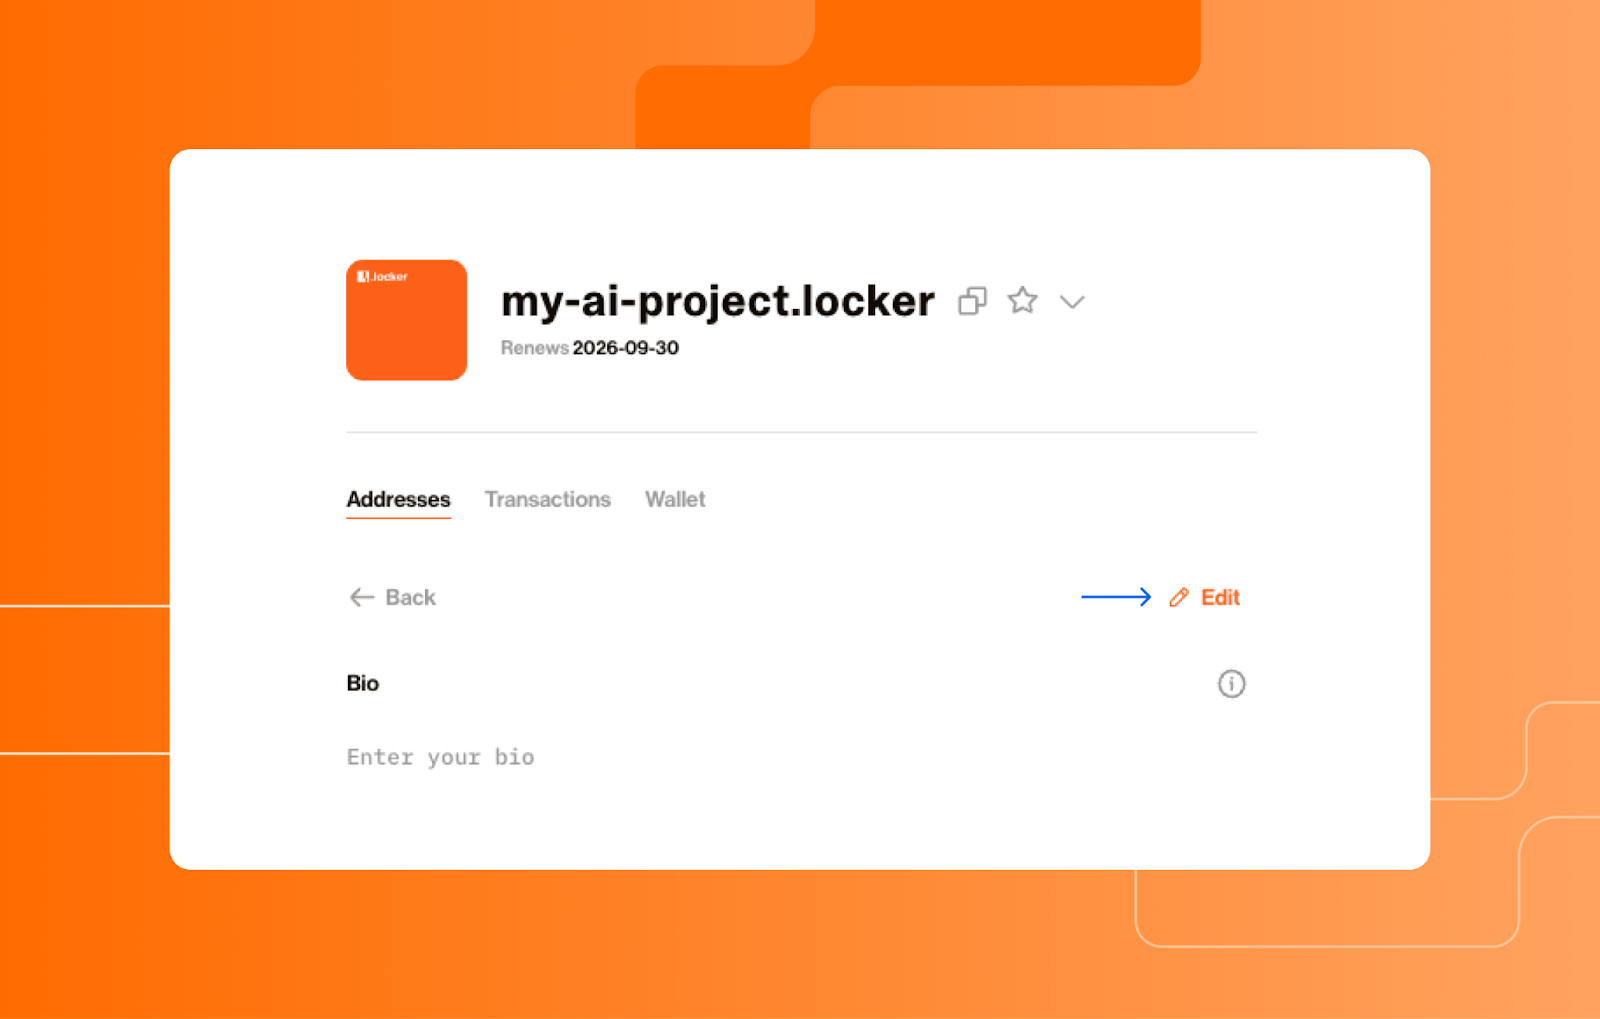
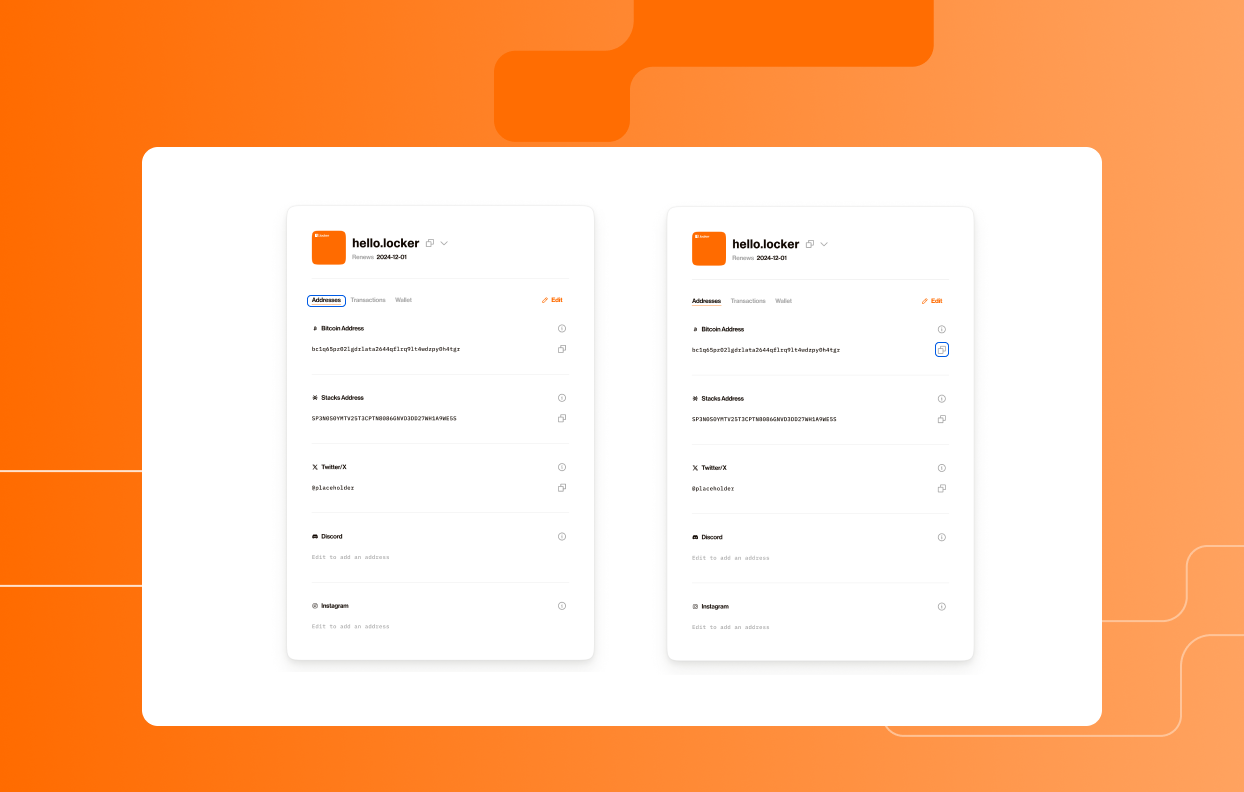
How to edit your Web3 addresses in the .locker app.
Your “Addresses” tab consists of addresses associated with your Web3 digital wallet as well as relevant personal social handles that you can configure.
It’s important for users to know, however, that you cannot change the addresses associated with your digital wallet. As such, we stress that users should only make changes using the “Edit” function if they notice discrepancies between the addresses listed in their .locker and those listed in their wallet.

If you receive an error message when you’re attempting to edit an address field, verify that the information entered is correct and matches the formatting associated with the address type.
Learn how to copy your Web3 digital wallet address in the .locker app.
Generally, you’ll be able to conduct transactions in your Web3 digital wallet with your human-readable digital identity. However, there may be certain situations where you’ll need to copy and paste the addresses associated with your Web3 digital wallet.
FAQs are accessible from the .locker app.
Users who are signed into .locker can quickly access our FAQs page from the app itself.

You can view your digital wallet transactions in the .locker app.
Users can view transactions associated with domain names and digital identities like purchases and renewals in their .locker app.
Learn how to view all your Web3 digital identities in the .locker app.
Digital identities associated with your .locker account will be displayed at the top of the app screen. They will take the form of “name.locker,” and users can have multiple .locker digital identities associated with their account.
To view all of their digital identities, users just need to follow these steps:
How to view all your Web3 digital wallet addresses.
Once users have connected their Web3 digital wallet and claimed their .locker digital identity, they can always view their associated wallet addresses on the main .locker dashboard.
Learn how to sign out of the .locker app.
We encourage users to sign out of their .locker accounts when the app is not in use. This is to prevent any third parties from potentially accessing your .locker account and your digital wallet without authorization.

Learn how to sign in to the .locker app.
Once you’ve claimed your .locker digital identity and created a digital wallet, you can sign into the .locker app without going through the onboarding process.

.locker's step-by-step guide will help you claim your Web3 digital identity.
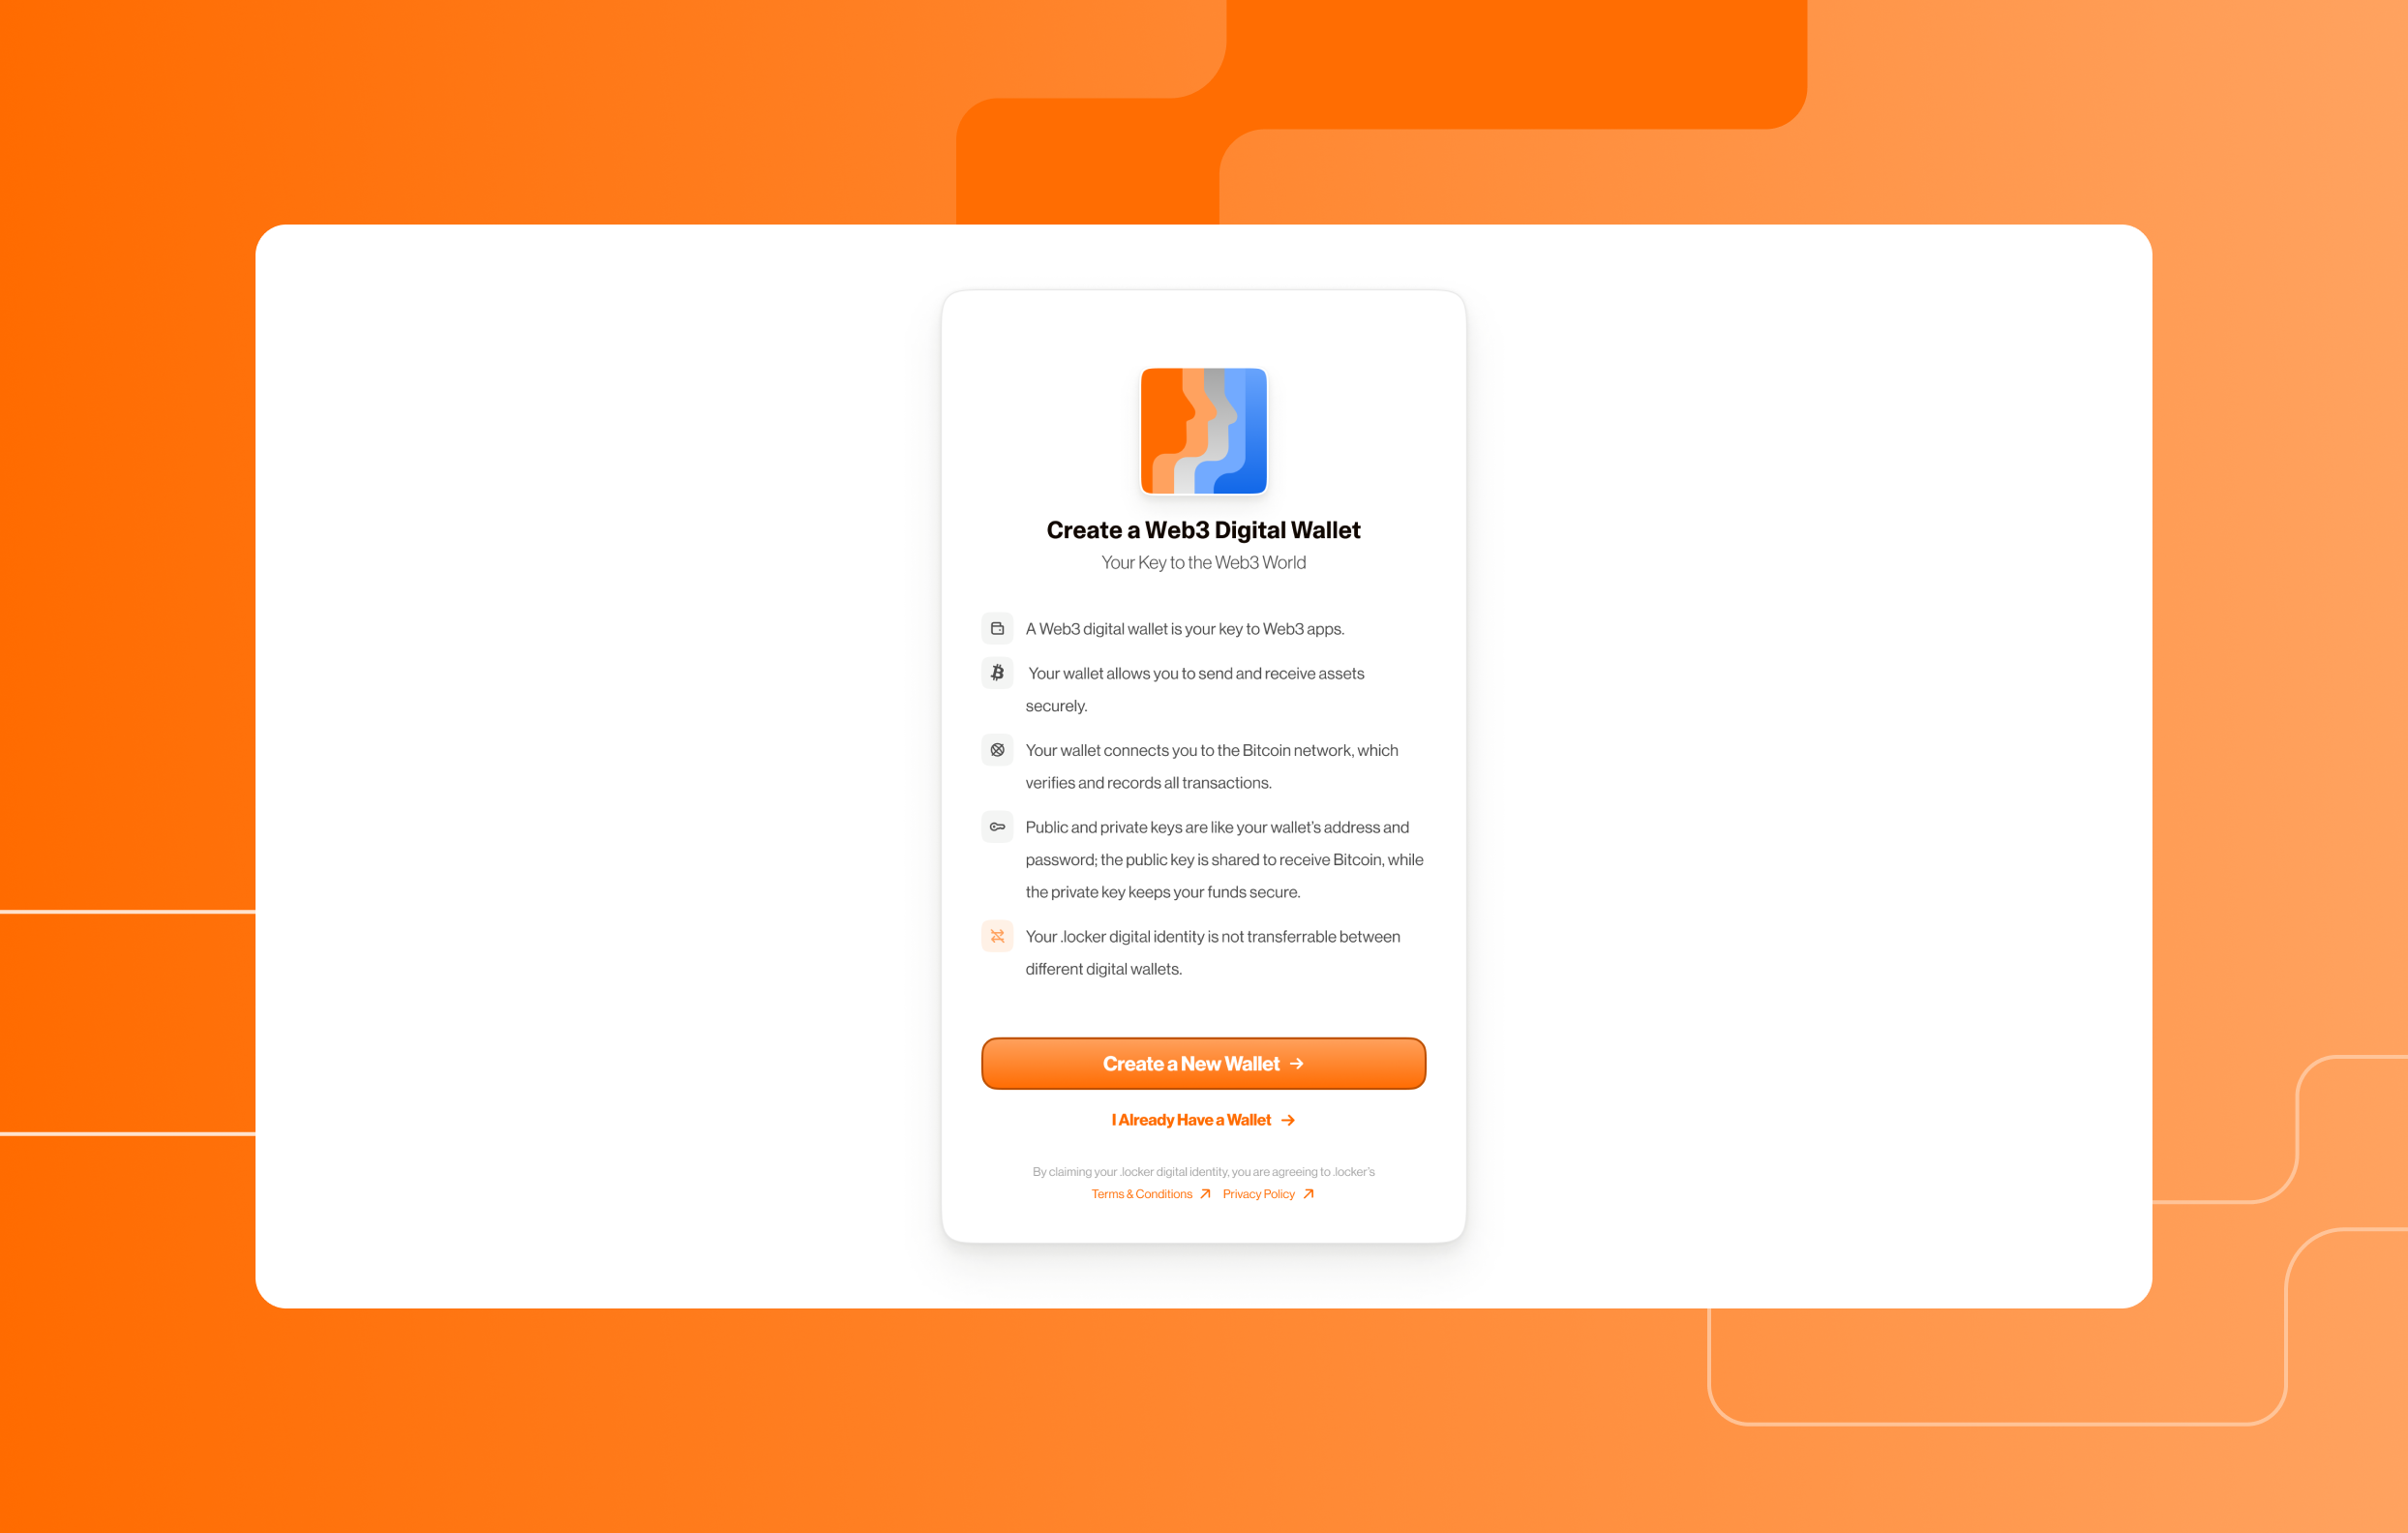
Users with an existing Web3 digital wallet can claim their corresponding .locker digital identity after they have purchased a .locker domain name from a registrar of their choice. After clicking the “Claim Now” link, users will follow a series of steps to claim their .locker digital identity.
Note: Configuring a Leather or Xverse wallet is required. Once your Bitcoin wallet has been configured, you will be able to connect other Ethereum digital wallets, like MetaMask or Phantom.
If you run into any issues with claiming your digital identity, contact .locker’s support team. Your domain registrar will not be able to assist with this process.
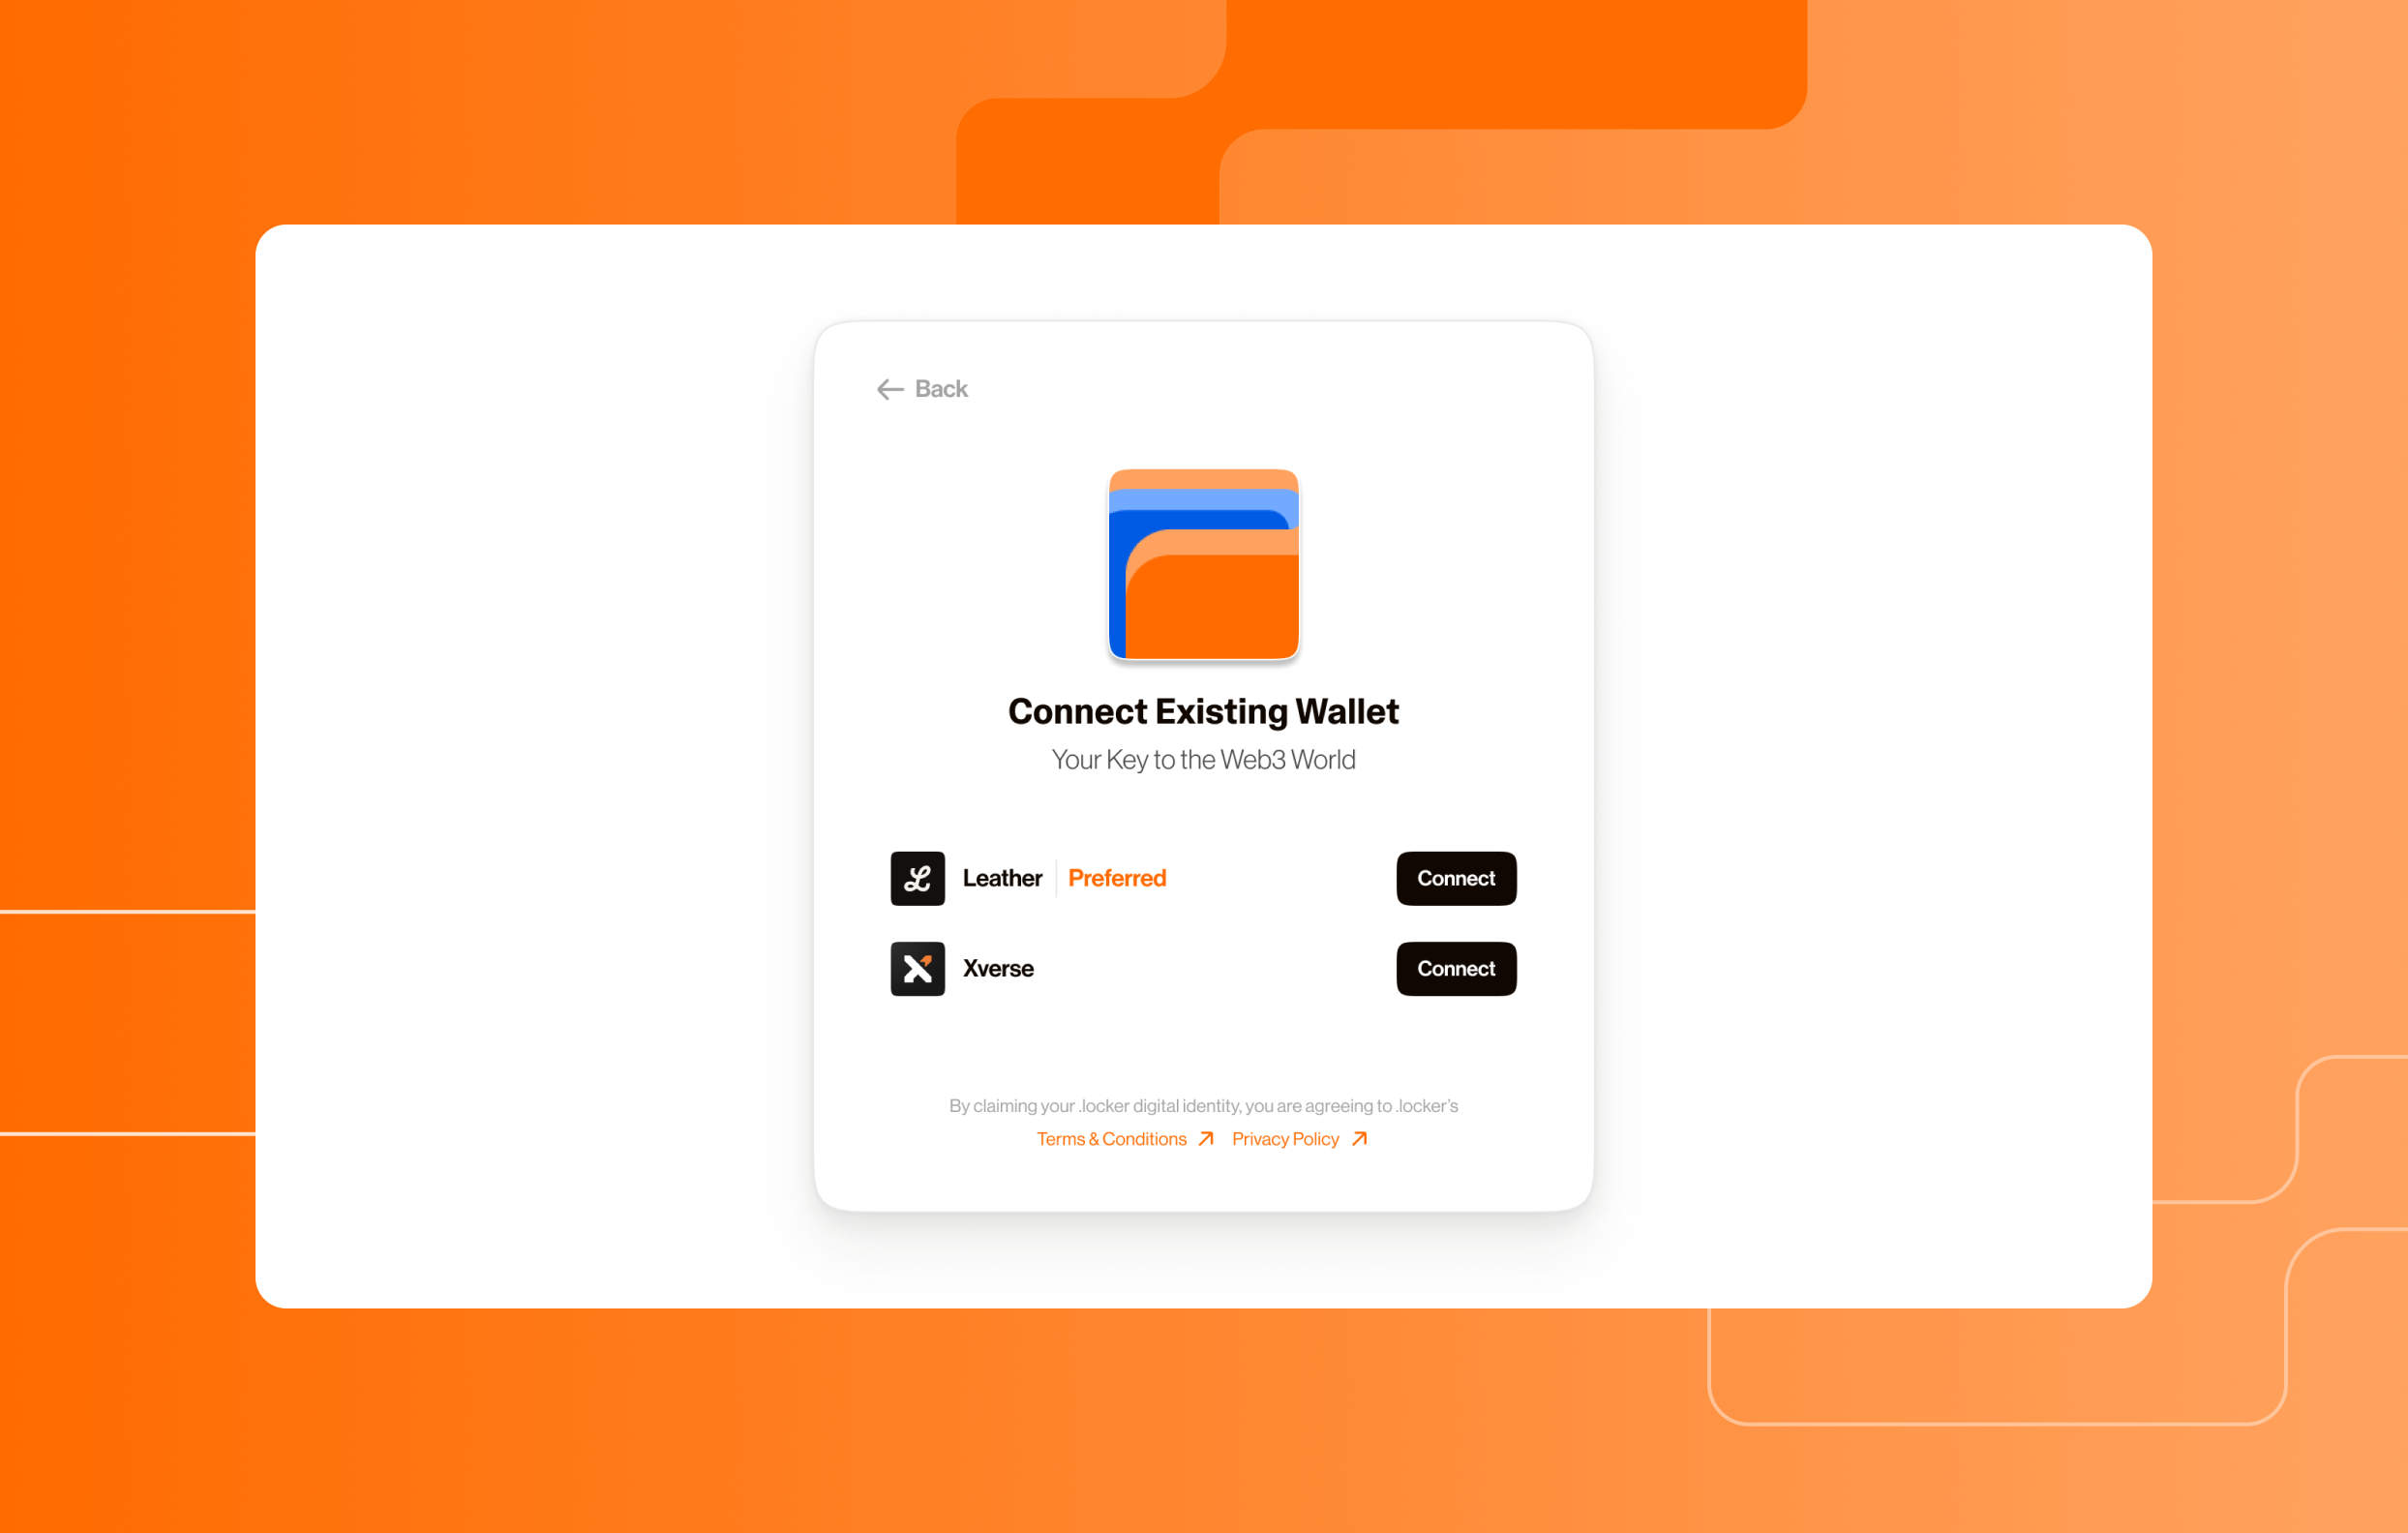
.locker's step-by-step guide will help you claim your Web3 digital identity.
Users can claim their corresponding .locker digital identity after they have purchased a .locker domain name from a registrar of their choice. After clicking the “Claim Now” link, users will follow a series of steps to claim their .locker digital identity.
There are two main components involved in claiming your .locker digital identity with a new Web3 digital wallet:
Note: Configuring a Leather or Xverse wallet is required. Once your Bitcoin wallet has been configured, you will be able to connect other Ethereum digital wallets, like MetaMask or Phantom.
If you run into any issues with claiming your digital identity, contact .locker’s support team. Your domain registrar will not be able to assist with this process.

.locker's step-by-step guide will help you claim your Web3 digital identity.
When you purchase a .locker Web3 digital identity through any supported registrar, you’ll receive a Magic Link via email. By following the link, you can initiate the process to claim your Web3 identity, even if you prefer using different wallet addresses for separate identities.
Each .locker digital identity you purchase can now be assigned to any wallet of your choice. This means that, instead of auto-linking to a single wallet, each claim process allows you to connect a different wallet if desired.
Note: Configuring a Leather or Xverse wallet is required. Once your Bitcoin wallet has been configured, you will be able to connect other Ethereum digital wallets, like MetaMask or Phantom.
You have full control over which wallet each identity is linked to during the claim process.
If you run into any issues with claiming your digital identity, contact .locker’s support team. Your domain registrar will not be able to assist with this process.

Learn the basics of protecting your digital assets.
As the decentralized web continues to evolve, it opens up revolutionary new opportunities including permissionless finance to digital ownership. But with this new frontier comes new risks. Web3 security is just as critical as Web2 security. If your digital identity or assets are compromised, the consequences can be irreversible and financially devastating. In Web2, security breaches often involve personal data theft, account lockouts, or fraud. In Web3, the stakes can be even higher; one compromised private key or seed phrase can result in the permanent loss of your funds.
If you’re navigating the Web3 world, here are the essential steps to keeping your onchain assets secure.
Web3 flips the control paradigm: users own their data, their identities, and their funds. But with this power comes personal responsibility. You’re your own bank. And just like you wouldn’t leave your bank PIN on a sticky note on your front door, you shouldn’t leave your seed phrase unprotected. Your seed phrase and private keys are the master keys to your digital wallet and its associated digital identity. Sharing these, even with people you trust, puts you at serious risk of theft or exploitation. If someone is asking for your seed phrase or private key, it is a big red flag. Scammers often pose as support agents or friends to trick users into revealing this information. Reputable entities will not request this information, especially through third-party chat applications and social media.
We all know we shouldn’t store passwords and other sensitive data in email, locally saved documents, and note apps. These methods aren’t secure and can be leaked or hacked. Chances are, you’re taking the risk and doing it anyway. If you need one reason to revisit your online security practices, Web3 is it. If you lose your seed phrase or private key, or if someone else gains access to this information, your investments are at risk. There is no way to reset a password or to ask customer service for access to your digital wallet with Web3. And if the wrong person gets access, they can easily transfer your funds to their own wallets.
The solution is to write your seed phrase and private key down on paper and store it in a secure physical location. Others might keep this information safe in an offline storage device that can’t be hacked. Be sure to backup your backups. You never know what you may lose!
Reputation matters when it comes to digital wallets and cryptocurrency exchanges. Because decentralization is a core blockchain value, there are no regulatory bodies keeping tabs on who is considered safe or reputable.
A reputable digital wallet or crypto exchange will have regular internal security audits, offer security features and services, and will have a verifiable presence online. If any of the above are not true for your provider, you should strongly consider switching. A reputable digital wallet or exchange values security and safety. They want you to have enhanced security features to protect your account and identity. Be suspicious of providers that do not offer services like 2FA. That signals their stance on security is weak, and you could be at risk.
What does it mean to have a verifiable online presence? Your provider should have a fully functional, secure website. They should have a real physical address that is associated with their business and this address should be verifiable. They may have active social profiles, which helps legitimacy, but doesn’t automatically mean the brand is reputable. When researching, you want to see positive reviews, but be sure to inspect them closely to be sure they are real.
Unfortunately, it’s relatively easy to stand up a fake digital wallet or exchange and run off with users’ funds. Inspect your provider closely, investigate their reputation, and don’t let a well-designed website trick you into providing sensitive information.
Once you have a reputable digital wallet provider, like Leather or Xverse, you have steps to take to actually secure your wallet. The first step is making sure you have backups of your password, private key, and seedphrase. It is strongly recommended that you have physical backups of this information instead of digital copies. Remember that online documents and note applications are not inherently secure and could potentially be accessed by hackers.
Enable 2FA wherever it’s available, especially on exchanges and when managing wallets. But don’t just use SMS. Opt for third-party authentication apps like Google Authenticator, which is far more secure and less vulnerable to SIM-swapping attacks. And remember - if options like 2FA aren’t available, then you should find another company to do business with.
Never access your wallets or make transactions over public WiFi. These networks are easy targets for man-in-the-middle attacks. At the most basic level you shouldn’t be using public WiFi for online shopping, banking, or other sensitive activities. You especially shouldn’t be using it for cryptocurrency. There is no failstop for your digital wallet if a bad actor gets your passwords!
Even at home, using a VPN adds an additional layer of encryption to your online activity, making it harder for malicious actors to snoop.
Divide your assets across multiple wallets. Consider having a hot wallet for everyday transactions and a cold wallet for long-term storage. A hot wallet is connected to the internet so it’s ideal for trading and transactions, but this also means it is more susceptible to hacking. Cold wallets are not connected to the internet and are by default more secure. Transactions from a cold wallet require extra verification steps, making it less investor friendly than a hot wallet. Cold wallets are commonly used to store funds until they are ready to be transferred to a hot wallet.
Beware of the combination of a too-good-to-be-true offer with high-pressure sales tactics. The offer is meant to hook you, and the pressure is meant to make you drop your guard. Web3 scams are meant to hijack your digital wallet and identity, or meant to scam you out of an investment. Phishing is an extremely common scam where cybercriminals will attempt to get you to provide your account login information, private key, or seedphrase, usually by posing as a trusted entity. Investment scams come in the form of rug pulls, pump and dump schemes, and straight up theft of assets from wallets.
Always remember to slow down, do your research, and don’t buy into the hype. Keep in mind that you can never be too suspicious. Scams are ever-evolving and new tactics are always being tested.
Web3 puts you in control, but that control comes with responsibility. By taking simple but crucial steps to secure your onchain assets, you can reduce the risk of loss and stay ahead of potential threats. In a space where one mistake can cost you thousands, or even millions, of dollars, staying vigilant and adopting best practices isn’t just smart, it’s essential.
Can you spot the phishing attempt? Take the quiz below.
Think you’re an expert at spotting a malicious email? Test yourself below to see if you can catch the phishing warning signs.
You received an email from Amazon.com with the subject line and sender information below. Can you find two signs that this email is a phishing attempt?

The domain name does not match the well-known domain of Amazon.com. When you visit the Amazon website, you do not visit amaz0n-inc.info. This is a major warning sign that this email is a phishing attempt. Red flags should always go up when you are being prompted to verify account information via email, chat, or phone. Login credentials, payment information, and personal addresses can all be used to hijack your identity online.
You received the following email in your inbox. You didn’t order an iPhone or authorize a charge to your credit card, but before you contact Apple for a refund, can you spot three indicators that this may be a phishing scam and not an actual notice of payment?
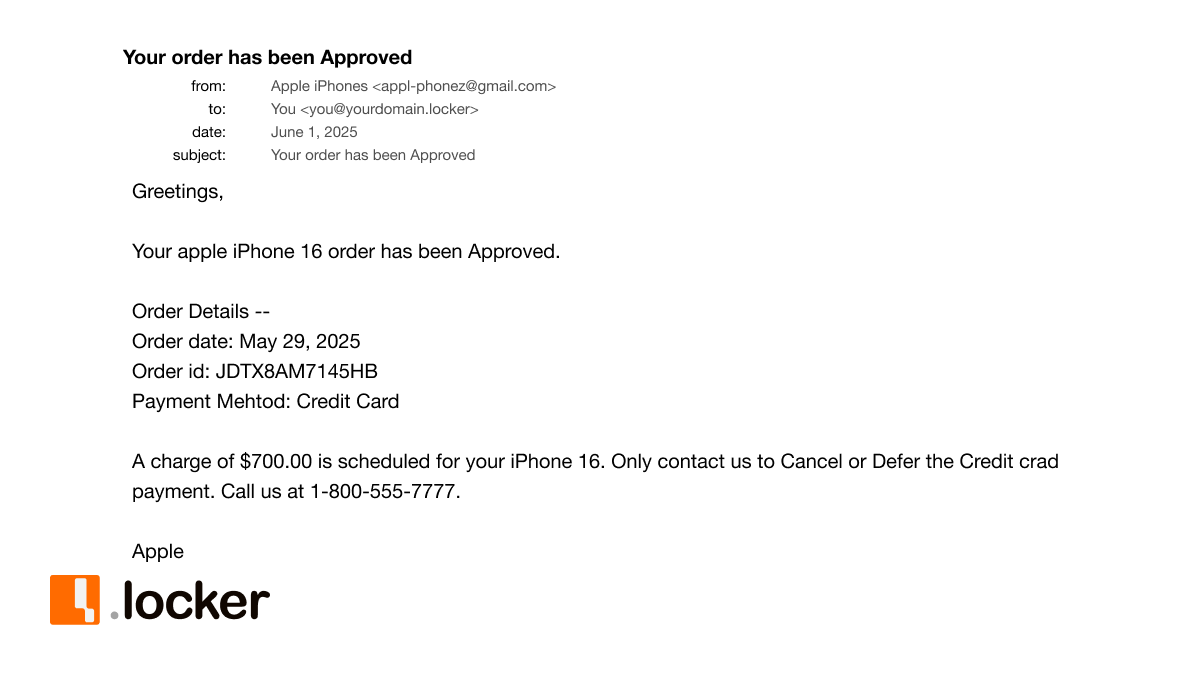
The sender’s email address is suspicious and not what you would expect from Apple.com. The email is coming from a generic Gmail address; large companies tend to use branded URLs so you can identify the sender, like support@apple.com. The generic address combined with the misspellings is a big indicator that this email is actually meant for phishing.
Be wary of the generic greeting and lack of identifiable information, like the last four digits of your credit card number supposedly used for this purchase. The same exact email was likely sent to thousands of unsuspecting people. They hope that the scare tactic alone is enough to get you to call them.
Finally, the phone number provided in this email is not associated with Apple. Visiting the Apple website can confirm this information. Always double check before calling phone numbers! The hope is you will call in and provide your real credit card information for the cybercriminals to steal.
Other less obvious indicators that you may have found include:
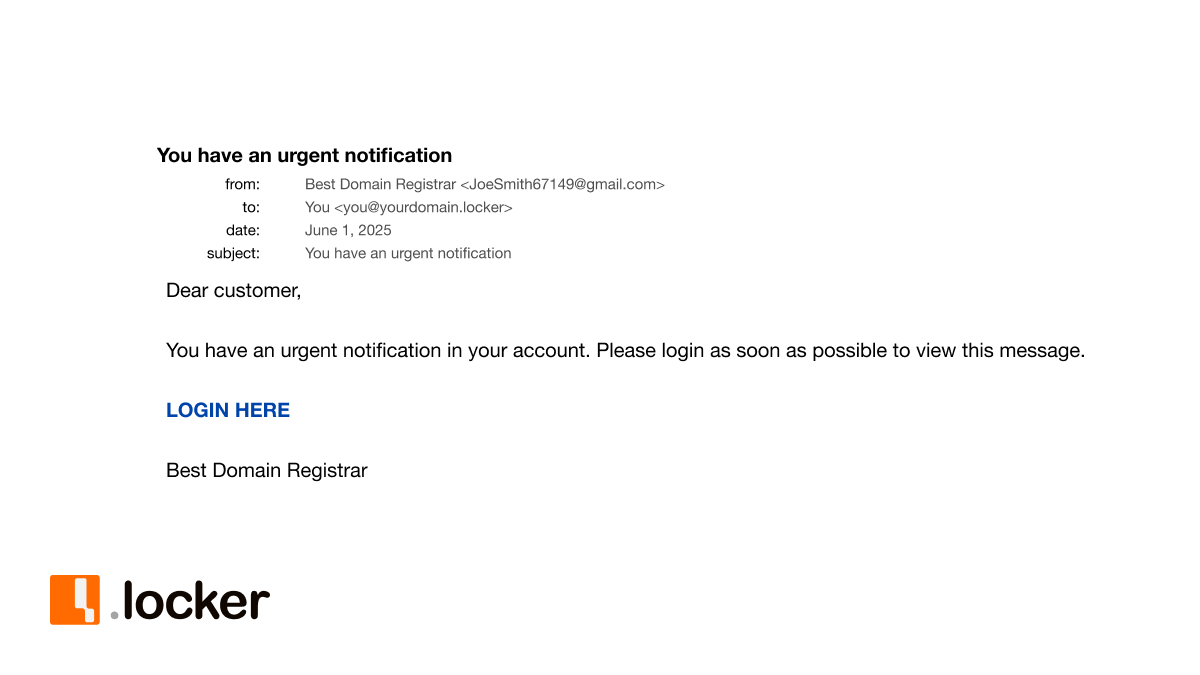
You receive the following email with a link to login to your domain registrar account to address an urgent matter. What should you do next?
If you said check the URL before clicking the link, you’re correct! You never know what the true destination of a text link or shortened link is. You should always investigate further by hovering over the link, or by copying and pasting the link into a notepad application.
You hover over the link to see the full URL below. Does this email seem trustworthy? What factors influenced your decision?
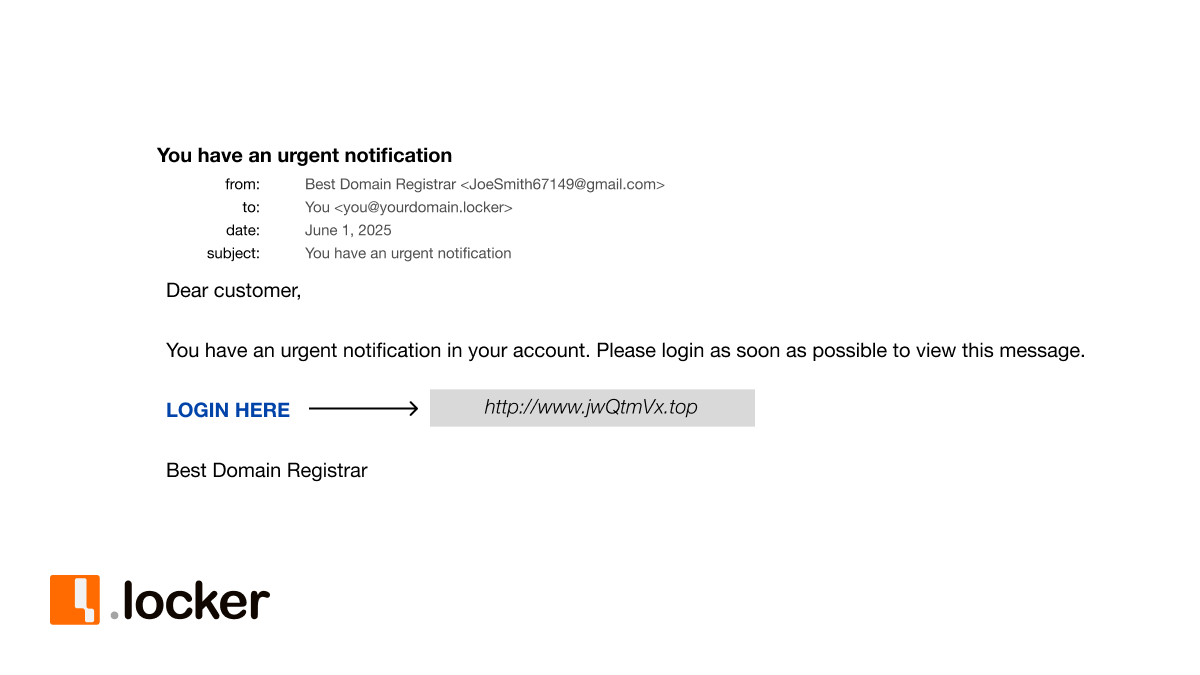
The answer is no, this email is not trustworthy and you should disregard the message. The URL behind the link doesn’t look like it belongs to Best Domain Registrar, and the address this email was sent from doesn’t look right either. This is likely a phishing attempt to access your domain registrar account and hijack your domain name.
For more information on phishing and tips to keep your digital identity safe, visit the Security and Safety Center at my.locker.
Web3 scams are always evolving. Here are some of the most common scams seen in 2025.
Web3 scams come in all shapes and sizes, and they are becoming increasingly complex. Here are three common scams from 2025 that you need to watch out for.
Elon Musk, the owner of social media platform X, is an outspoken investor in cryptocurrency with a reach of millions upon millions of people. His large audience and his propensity to share his thoughts around onchain assets makes him the perfect character for impersonation scams. Imposters will use Musk’s image and credibility to lure you in with sophisticated tactics. There are reports of YouTube livestreams featuring “Musk” where viewers are asked to send Bitcoin and other crypto to Musk himself, usually with a promise of doubling or tripling your investment in a short period of time. The truth is the video of Musk has been altered or is being misused, and the offer is completely fake. You will never see your investment returned. It doesn’t stop at Musk, either. His businesses, affiliates, and colleagues are also being used as bait for unsuspecting crypto investors.
It can be incredibly difficult to spot a scam as complex as a fake video livestream, but you can take action to protect yourself in even the most convincing situations. The most basic thing you can do is ask yourself whether the offer seems too good to be true. Any promise of suspiciously high ROIs is a warning sign, not an opportunity. You may also find that there is a sense of urgency around making the investment. This is by design. Urgency combined with the trust of Musk are the perfect tools to get you to drop your guard and invest in their scam.
Coinbase is one of the largest crypto exchange networks in the world, making it a prime target for phishing attacks. In March 2025, it was reported that Coinbase users had lost over $46 million in cryptocurrency due to extensive phishing attacks. Here’s how it works. A supposed representative from Coinbase will contact you to resolve some sort of issue, usually a security issue to scare you into contacting them right away. They’ll ask you a series of questions, maybe your account password, private key, or even seed phrase. All of this will be under the guise of confirming your identity. To help enhance the scam, they will sometimes use multiple channels at once. You might receive real-time confirmation emails while on the phone with a representative. Unfortunately, this common scam feels very official and real, but it’s just a ruse to get you to give up your confidential information.
Remember that trusted exchanges like Coinbase will not ask you for your login credentials, private key, or seed phrase. It’s also very rare to receive an unsolicited phone call; any unexpected contact should be approached with caution. Check with your exchange to see what their contact policies are so you can be aware and prepared.
As more people have become aware of Web3, they have also become more aware of the potential risks. Rug pulls are reportedly on the decline in 2025 but that doesn’t mean the consequences of a rug pull are any less devastating.
Despite driving a market cap of $4.56 billion in just two hours, the Solana token LIBRA is now known as one of the more notable rug pulls of 2025. What makes this story unique is the support from Argentinian President Javier Milei. His stamp of approval on LIBRA resulted in an inherent level of trust around the token, resulting in a high level of confidence and hype. Within hours of launching and hitting its market cap, LIBRA almost completely collapsed, leaving investors with a token that was next to worthless. President Milei has now walked back his support of LIBRA, but it doesn’t change the losses experienced by investors.
Direct support from an influential figure can muddy the cryptocurrency waters. In the case of LIBRA, governmental support was the catalyst to a high market cap. If investors took a closer look, they would have realized that the project plan backing LIBRA was not transparent. This should always be a red flag for onchain assets. Had there been a transparent project plan, investors would have been aware that LIBRA’s founders held over 80% of the token. This made it easy for the founders to fleece investors by quickly cashing out and causing the price of LIBRA to plummet.
Scams are everywhere and the best way to protect yourself is through education. Learn more about how you can protect your Web3 digital identity with the resources from .locker’s Learning Hub and Help Center. User guides, checklists, and more can be found to help you establish a comprehensive Web3 security program.
Use .locker's Web3 Security Checklist to keep your identity and assets safe.
Maintaining good Web3 security practices is critical to protect your assets. Vulnerabilities are everywhere and scams are prolific, but you can prevent them.
The gateway to your assets on Web3 is your digital wallet. Every transaction will flow through your wallet and onchain assets will be stored there, and that makes it very attractive to cybercriminals. Below is a list of what you need to do today to secure your digital wallet on the blockchain.
In addition to implementing tight security measures for your digital wallet, there are best practices you can follow to stay safe while transacting.
Extortions, romance scams, and impersonator are all common on Web3.
What it is:
Watch out for impersonators and romance scams! Bad actors will pose as support from a trusted provider, as an influencer, even as a friend or potential partner to lure you in. Web3’s anonymity can be a benefit, but it can also make it easier for people to impersonate others. And make no mistake, these scammers can be very believable. Before you know it, you will be trusting them and sending Bitcoin, or maybe even your private key or seed phrase. Once you send Bitcoin to someone, there is no way to reverse the transaction. They will have your money forever.
A more extreme form of impersonation involves blackmail and extortion. Usually the scammer will claim to have sensitive or compromising information on you, and you need to pay up otherwise they’ll send it to all your family and friends! This scare tactic is meant to rattle you so you’ll panic and pay the ransom without second thought.
How to avoid it:
Beware of rug pulls, elaborate investment scams that can steal your funds.
What it is:
Rug pulls come in different forms, but the overarching theme is that they are all investment scams. Pump and dump schemes, team exits, liquidity pulls, and limiting sell orders are intended to defraud you and take your funds. Notable rug pulls include the Squid Game token and OneCoin.
Rug pulls can be hard to spot. They can be elaborate scams that pull in people you trust, making it easier to pull you in as well. The offers can also be very enticing and promising. Scammers are relying on your fear of missing out to take advantage of you.
How to avoid it:
Airdrop scams are the new edition of phishing.
What it is:
Airdrop scams are the new edition of phishing. The goal is the same- to steal your personal information so they can exploit it, but the method is slightly different. A crypto airdrop will drop a free token directly into a user’s wallet to build awareness and hype around a project. They’re attractive because they require little effort to redeem and they could result in a big return. When legitimate, airdrops can be an opportunity. When fake, airdrops can result in the theft of your digital wallet.
How to avoid it:
Learn how to spot counterfeit NFTs.
What it is:
Scammers create and sell counterfeit NFTs that look like legitimate artwork from well-known collections. It’s relatively easy to plagiarize an NFT, which enables scammers to flood the market with fake NFTs. At one point, it was estimated that 80% of NFTs were fraudulent. Just because it’s minted on the blockchain doesn’t mean it’s unique or holds the value it promises. Victims think that they are buying a verified, valuable asset only to find out it’s worthless.
How to avoid it:
Check the history. Every transaction is recorded on the blockchain. This level of transparency allows you to verify the NFT’s authenticity and the seller’s transaction history
What should you do if your Web3 digital identity is stolen?
If you think someone has stolen your digital identity or if you suspect someone has access to your digital wallet, be sure to act quickly.
Not all Web3 digital wallets can be trusted. This is what you need to know.
One of the best ways to determine if your exchange or wallet provider is legitimate is to research the company. Read customer reviews and be wary of claims that seem too good to be true. Check the website for spelling and grammatical errors, including the domain name. Also check that the company offers customer support and security features, like 2FA. You want a company that values you as a customer, including your safety and protection. Finally, make sure the company has a real, physical address with contact information. You don’t want a provider that is hiding their identity or location.
Phishing is one of the most common Web3 scams you will encounter.
What it is:
Phishing is the practice of sending communications that are meant to look official and real, but in reality, they are fraudulent attempts to gather your personal information, like your credit card number, bank account number, or private key. Phishing is very common. Be wary of any request for sensitive information.
How to avoid it:
Web3 security includes keeping your domain registration safe.
Protecting your .locker domain registration ensures that you keep your .locker identity under your own personal ownership. There are a few best practices you can follow to protect your domain name:
You should also be wary of domain hijacking attempts. Domain hijacking is the act of changing the registration information of a domain name without permission in an attempt to transfer ownership away from the original owner. Unauthorized users will change the domain’s contact details, disable notifications, and then initiate a transfer to another registrar so they can fully take ownership of your domain.
Web3 security is vital for protecting user data and assets.
Because your digital identity is tied to a digital wallet, protecting your identity starts with wallet security. Here are some helpful tips on how to protect your Web3 digital identity.
